
Hehe. You asked for screenshots, you got screenshots. Tons of 'em. Maybe too many. But I was just finding it too hard to explain myself, and I was sure I was leaving some things out. Most of you experienced guys probably know all this already, so don't waste your time waiting for these downloads. However, if you had a hard time understanding my words the first time around, you might want to load this up and go eat a sandwich or something. 7 graphics at 25K each downloaded at 3K/sec is about...oh hell, a couple minutes.
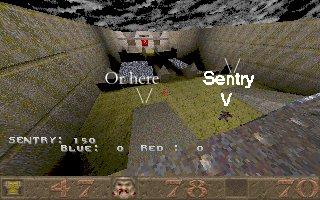
Regarding the placement of sentry guns, in these levels (2fort4 being
the favored one) I have my favorites. Number one favorite place -- about
 3/4
down the flag hallway (closer to the flag, in the dark part) on the side.
I put it on the side to hide most of its silhouette. [See Fig 2] That way
an attacker will peek in, not see any resistance, and then charge forward
committing himself, only to receive a hearty welcoming fireworks show in
the form of a flame spouting from the end of your sentry. In addition to
this, when I'm waiting in the actual flag room (which I'm usually not, the
engineer should be roaming, repairing armor and getting more cells and
ammo for his sentry), I nose up all the way to the wall, with my face
against it, then slide over until I can just see the doorway in the corner
of the screen. This way, I
3/4
down the flag hallway (closer to the flag, in the dark part) on the side.
I put it on the side to hide most of its silhouette. [See Fig 2] That way
an attacker will peek in, not see any resistance, and then charge forward
committing himself, only to receive a hearty welcoming fireworks show in
the form of a flame spouting from the end of your sentry. In addition to
this, when I'm waiting in the actual flag room (which I'm usually not, the
engineer should be roaming, repairing armor and getting more cells and
ammo for his sentry), I nose up all the way to the wall, with my face
against it, then slide over until I can just see the doorway in the corner
of the screen. This way, I  present
the smallest profile to the attacker who's just sliding past the doorway
to make sure no one is waiting there for him and that no pipe bombs are
scattered around the entrance. Killer combination, and advise your
teammates to do the same. [Editor's note: I make it a rule not to place
the sentry gun withing range of a grenade, otherwise they are too easily
killed. The flag hallway is ideal placement.]
present
the smallest profile to the attacker who's just sliding past the doorway
to make sure no one is waiting there for him and that no pipe bombs are
scattered around the entrance. Killer combination, and advise your
teammates to do the same. [Editor's note: I make it a rule not to place
the sentry gun withing range of a grenade, otherwise they are too easily
killed. The flag hallway is ideal placement.]
Second favorite place? In the 2nd floor room
directly adjacent to the grid floor room which drops down just behind and
below the sniper deck, facing towards the upper ammo room and the entrance
to the winding stairs to the flag basement. This is a very high traffic
area, providing a choke point for both the ramps and rocket jumping
soldiers who jump up onto the sniper deck to run through the back way
(blocks them from entering, see Fig e). This is also very easy to defend,
 for
it is near the ammo room and therefore an also high concentration of
friendlies. Why a sentry gun then? Because it is an often neglected spot
to place a sentry, and usually catches enemies off guard to really soften
them up for the basement defense. This room is not usually considered a
strategic area, but it very well is. Additionally, enemies must run toward
the sentry to get into the basement, effectively doubling the speed of the
rockets and bullets. This is also vulnerable to attack from below through
the grid floor; it would be wise to keep an eye out for demomen lobbing
pipes or soldiers shooting rox up near the sentry, but an
EMP grenade can usually take care of them
rather well. Anyway, you're right by an ammo room, so rebuilding and
repairing is not really a problem. Focus more on providing information for
your teammates on incoming attackers who are entering the basement. There
is a way to get around this sentry, but it is more roundabout -- jump down
the elevator shaft directly into the basement. However, there is almost
constant traffic here from respawning players, and it is rare when someone
can sneak through unscathed. Usually only solitary attackers will use this
venue -- it's too difficult to keep a large attack force together after
having to run across that little catwalk which runs across the ramp room,
and leaves them clumped up, ready to get blown away by a few rockets or
grenades.
for
it is near the ammo room and therefore an also high concentration of
friendlies. Why a sentry gun then? Because it is an often neglected spot
to place a sentry, and usually catches enemies off guard to really soften
them up for the basement defense. This room is not usually considered a
strategic area, but it very well is. Additionally, enemies must run toward
the sentry to get into the basement, effectively doubling the speed of the
rockets and bullets. This is also vulnerable to attack from below through
the grid floor; it would be wise to keep an eye out for demomen lobbing
pipes or soldiers shooting rox up near the sentry, but an
EMP grenade can usually take care of them
rather well. Anyway, you're right by an ammo room, so rebuilding and
repairing is not really a problem. Focus more on providing information for
your teammates on incoming attackers who are entering the basement. There
is a way to get around this sentry, but it is more roundabout -- jump down
the elevator shaft directly into the basement. However, there is almost
constant traffic here from respawning players, and it is rare when someone
can sneak through unscathed. Usually only solitary attackers will use this
venue -- it's too difficult to keep a large attack force together after
having to run across that little catwalk which runs across the ramp room,
and leaves them clumped up, ready to get blown away by a few rockets or
grenades.
Miscellaneous TF tip #17: If you're on defense, pick a good hiding spot where enemies can't see you when they come rushing in (good example: the little nook to the left of the door to the basement, coming down from the twisting ramps, in 2fort4). Then, let them run past into the flag room, and toss in a couple EMPs, napalms, concussion, or nail grenades right before they grab the flag. Then stand in their way -- they'll be trapped between the grenades and you, and in the time they have to make a decision, either you or the grenades will gib 'em or get 'em very drunk. Of course, this won't work with custom servers that play footsteps when you run... :) This is a great tactic if you are the only one on defense -- you'll catch them when they think they're safe, and that's the best time. Odds are, you have a better chance of killing the guy when he has your back to you and has no way of knowing you're there. Likewise, when attacking, don't forget to check these spots so your enemies don't use your own strategy against you.
 leaving
through the ramps get caught from behind, or a flag runner gets a bunch
of rounds in the face. Often, if I hear that the flag has been taken, I
will demolish my sentry and build one in this spot to catch the guy
running the flag if I can get there quick enough. I usually can't
upgrade it, though, so the merits of this are limited. Useful as a last
ditch effort, or against a solitary runner such as a scout which no one
can catch easily. [See fig 4, heavy type]
leaving
through the ramps get caught from behind, or a flag runner gets a bunch
of rounds in the face. Often, if I hear that the flag has been taken, I
will demolish my sentry and build one in this spot to catch the guy
running the flag if I can get there quick enough. I usually can't
upgrade it, though, so the merits of this are limited. Useful as a last
ditch effort, or against a solitary runner such as a scout which no one
can catch easily. [See fig 4, heavy type]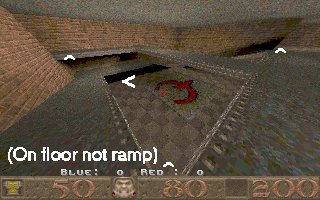
 Everybody
expects them, and more often than not they are immediately discovered
and destroyed. Since they can't dodge, their value here is limited. In
my opinion, human players can defend the ramps much better than a sentry
can. Possible sentry positions are in fig 5 (I was too lazy to take a
screenshot for SK and 2forts, haha) and my favorite ramp room position
in fig 6.
Everybody
expects them, and more often than not they are immediately discovered
and destroyed. Since they can't dodge, their value here is limited. In
my opinion, human players can defend the ramps much better than a sentry
can. Possible sentry positions are in fig 5 (I was too lazy to take a
screenshot for SK and 2forts, haha) and my favorite ramp room position
in fig 6. This
will eliminate any flag runners, if it's still working when your flag
gets taken, hehe. This works much better in the blue fort, for this
corner is much darker there. I usually switch between this position and
the one blocking the grate room. They think they're safe, then....BOOM.
This
will eliminate any flag runners, if it's still working when your flag
gets taken, hehe. This works much better in the blue fort, for this
corner is much darker there. I usually switch between this position and
the one blocking the grate room. They think they're safe, then....BOOM.A couple last sentry placement tips: first, go to the
tips page for a suggestion from one of
our readers. Second, see Fig 8.  The
two doorways are to the flag (left) and respawn/elevator (right). My back
is facing the ramp entrance to the basement. By positioning the sentry in
this way, you have eliminated the possibility of a grenade killing it.
Some engineers hide it around the corner to the right and point it towards
the two doorways in the background; I prefer it this way because it will
catch anyone who comes through the door, and won't allow any attackers to
get close enough to throw an accurate grenade. Additionally, it will pick
up on any enemies which jump down the elevator shaft and enter through the
back way; if they shoot at it, they are in the gun's detection range and
it will shoot them. It will also be a big pain in the ass (pun intended)
for any flag runners. Here, the sentry has no weakness other than being
swamped with targets. :) Unfortunately, this is often all it takes to
destroy a sentry; it's so confused it picks up on only one and then the
others can destroy it while it's shooting at the target. Be sure to warn
your teammates of its location so they can stay out of its way and let it
do its job.
The
two doorways are to the flag (left) and respawn/elevator (right). My back
is facing the ramp entrance to the basement. By positioning the sentry in
this way, you have eliminated the possibility of a grenade killing it.
Some engineers hide it around the corner to the right and point it towards
the two doorways in the background; I prefer it this way because it will
catch anyone who comes through the door, and won't allow any attackers to
get close enough to throw an accurate grenade. Additionally, it will pick
up on any enemies which jump down the elevator shaft and enter through the
back way; if they shoot at it, they are in the gun's detection range and
it will shoot them. It will also be a big pain in the ass (pun intended)
for any flag runners. Here, the sentry has no weakness other than being
swamped with targets. :) Unfortunately, this is often all it takes to
destroy a sentry; it's so confused it picks up on only one and then the
others can destroy it while it's shooting at the target. Be sure to warn
your teammates of its location so they can stay out of its way and let it
do its job.
UPDATE 12/8
I got this tip from a friend of mine quite a while ago and only
recently dug it up. This is a great sentry spot
 which
is almost indestructable in the map 2fort32, which I don't play much
anymore. I thought it would be something to put up, though, since this is
the ultimate Engineer guide. :) Anyway, in the figure at right [fig 9]
you'll see where this spot is. It's kind of hard to get to, but a simple
grenade jump will secure your team's base against everything but rocket
and pipe jumpers. Enemies will HATE you for this one.
which
is almost indestructable in the map 2fort32, which I don't play much
anymore. I thought it would be something to put up, though, since this is
the ultimate Engineer guide. :) Anyway, in the figure at right [fig 9]
you'll see where this spot is. It's kind of hard to get to, but a simple
grenade jump will secure your team's base against everything but rocket
and pipe jumpers. Enemies will HATE you for this one.