
After being prompted by the creator of this map himself (>V<Someone) I decided to go ahead and do an engineer guide for the map 2tech4. When I publicized this fact, I was swamped with offers for assistance, and asked others if they would consider helping me with an introductory tour. My good friends [eLD]Golbez, [ETC]SliM, and [RA]Greedy Fly all helped me put together this guide either in demonstration or cannon fodder. :) Thank you very much for your time and charity, guys, this is as much your work as it is mine.
This map is very defensively oriented, and thus is a great place for the engineer to have fun. In addition, the engineer is able to "hack" certain parts of the enemy map and thus create a more friendly environment for his fellow attackers, which I think is an excellent idea (though this supports the "offensive engineer" I dislike so much). However, the offensive engineer also creates more of a balance, for more often than not it is extremely difficult to penetrate the defense of the ramp room, and if an engineer must leave behind his gun it only creates more of a balance between offense and defense. The only defect with this map is that it is quite hard to get to the enemy flag, and thus more often than not people only sit in their base to defend. However with a degree of teamwork defenses can be beaten, especially with the help of the engineer hacking. I recommend about a 3:1 ratio of players to engineers (one quarter of the team is engineer). You will need a lot on this map. Really, lots of demomen, soldiers, and engineers. There should be an absolute minimum of 2 engineers on each team, more if at all possible. Soldiers are really effective at offense in this map when coupled with an engineer.
Before I start, just a clarification of terms. There are 3
ways to enter the ramp room, as seen in Fig 1: through the stairs, which
when entering the fort is the right door; the platform, which when
entering the fort is the left door; and the sniper entry, which
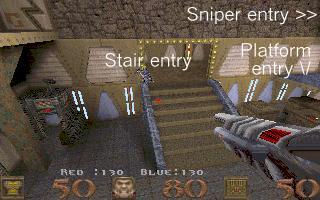 is
used most often by soldiers or demomen jumping up from the bridge aread
below the deck. This entry is also used by those who get on the elevator
hacked by the engineer. Of these, the hardest to defend from is the sniper
entry since it most often puts an attacker at eye level with your gun and
within easy reach of a grenade. This can be combatted, as you will see in
the following paragraph. The 'x' denotes a complementary sentry spot. If
you place sentries in both these positions, your ramps are impassable.
Period.
is
used most often by soldiers or demomen jumping up from the bridge aread
below the deck. This entry is also used by those who get on the elevator
hacked by the engineer. Of these, the hardest to defend from is the sniper
entry since it most often puts an attacker at eye level with your gun and
within easy reach of a grenade. This can be combatted, as you will see in
the following paragraph. The 'x' denotes a complementary sentry spot. If
you place sentries in both these positions, your ramps are impassable.
Period.
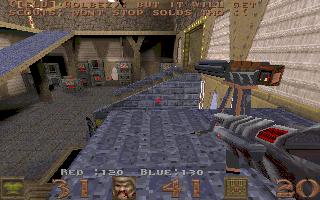
To start, I think the best place for sentry guns (in this
map, mind you), is the ramp. I have not followed my usual policy of no
sentries in the ramps but in this map things are different. This room is
an incredibly tight chokepoint, and it is small enough that it prevents an
attacker from being able to dodge effectively. The most successful spot I
have seen so far is shown in fig 2. In this location, the sentry covers
all entryways, has the center rafters to help protect from attackers
coming from the sniper deck, has an ammo room very close by, and detects
in all ranges. The most important thing about placement here is that it
hangs over enough for it to detect enemies below attempting to lob up
grenades (notice how the leg hangs over the edge of the platform a bit --
do this for all ramp room sentries). 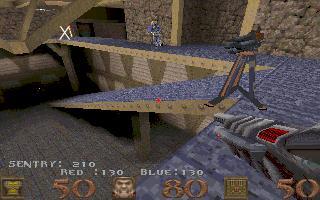 This
is quite successful in defending any attack upon the ramps. A variation on
this is having the sentry farther down on the ramp. Accomplishes the same
purpose, but it is much harder to hit with grenades and is also difficult
to shoot at since it is not at eye level.
This
is quite successful in defending any attack upon the ramps. A variation on
this is having the sentry farther down on the ramp. Accomplishes the same
purpose, but it is much harder to hit with grenades and is also difficult
to shoot at since it is not at eye level.
There are, of course, several other places to put sentries
in this map, but in general they are quite obvious.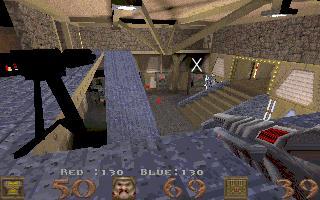 I like this one (Fig 3) even though it does have a weak spot at the
platform entry. This will immediately devour anyone entering through the
sniper deck, but is also susceptible to a grenade attack. It's a tossup
depending on your defensive situation. Most often I start the game with
the sentry located at fig 1 and then adjust its positioning depending on
the competence of attackers and their method of attack. Variation is
probably your best weapon in conjunction with your sentry.
I like this one (Fig 3) even though it does have a weak spot at the
platform entry. This will immediately devour anyone entering through the
sniper deck, but is also susceptible to a grenade attack. It's a tossup
depending on your defensive situation. Most often I start the game with
the sentry located at fig 1 and then adjust its positioning depending on
the competence of attackers and their method of attack. Variation is
probably your best weapon in conjunction with your sentry.
Thus far all sentry suggestions have been for solitary
engineers. The following placement (fig 4)
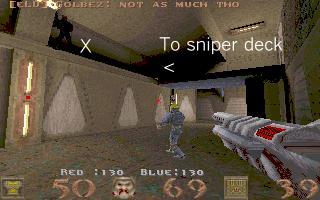 is
great if you're having trouble with the sniper guys, and used in
conjunction with Fig 5. Placing the sentry anywhere near the 'x' is
acceptable, but the farther to the left you get (where the engineer is
standing on top, all in black) the better. This covers two entryways
(stair and sniper) so a sentry on the platform entrance (fig 5)
is
great if you're having trouble with the sniper guys, and used in
conjunction with Fig 5. Placing the sentry anywhere near the 'x' is
acceptable, but the farther to the left you get (where the engineer is
standing on top, all in black) the better. This covers two entryways
(stair and sniper) so a sentry on the platform entrance (fig 5)
 to
compelemnt it will totally take care of all your defensive needs. It would
be better, however, to face the sentry towards the entrance to the
platform (that is, toward me taking the picture) since all its traffic
will be coming through that way. Killer combo!
to
compelemnt it will totally take care of all your defensive needs. It would
be better, however, to face the sentry towards the entrance to the
platform (that is, toward me taking the picture) since all its traffic
will be coming through that way. Killer combo!
Another good combo is on the top 2 corners nearest to the ramps; one as in Fig 2 and another as in fig 3. Pretty much any combination you can think of will suffice, just as long as they're on opposite sides of the room and cover each other to a degree, as well has hanging over the edge to cover the entire floor. The possibilities are endless, and if I had my choice, all sentries would be here in this room.
If you prefer flag sentries, Figs 6 and 7 are probably your
best choices. The sentry should be at the crosshair in Fig 6, or alternatively, in Fig
7, facing the shaft (that is facing where the photo is being taken from).
However Fig 7 is more exposed to a grenade attack from the stairs on the
left side of the pic; usually I move it to the left more so that it is
perpendicular to the wall in front of the stairs to prevent a grenade
attack. Fig 7 is great if you're having problems with enemies jumping down
the hacked main lift.
The sentry should be at the crosshair in Fig 6, or alternatively, in Fig
7, facing the shaft (that is facing where the photo is being taken from).
However Fig 7 is more exposed to a grenade attack from the stairs on the
left side of the pic; usually I move it to the left more so that it is
perpendicular to the wall in front of the stairs to prevent a grenade
attack. Fig 7 is great if you're having problems with enemies jumping down
the hacked main lift.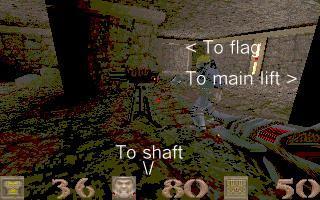
Now for the next important ability of the engineer --
hacking the enemy fortress. I love this. If you'll notice, there is a
large "tech center" directly under the top of the ramp. In here
are six terminals (buttons), each with a different function. An example of
a terminal is in Fig 8. To activate a terminal, simply hit it with your
spanner. You will receive a message display telling you what the terminal
accomplished. For purposes of organization, I will label the buttons 1-6
as labeled in Fig 9. 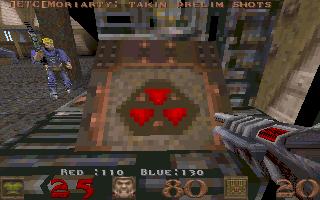 As
noted above, each terminal has a different function which can only be
accessed by the engineer. [For reference -- in the game, the terminals are
labeled from left to right while facing the tech center, 1 being the
leftmost which is directly under the end of the top of the ramp.] If
you're the engineer at the enemy terminal, there is a pretty safe hiding
place near switch 6. Duck in there in between hacks on the off chance that
no one will notice, and you can remain there for some time. Periodically
check this spot in your own base for spies and engineers.
As
noted above, each terminal has a different function which can only be
accessed by the engineer. [For reference -- in the game, the terminals are
labeled from left to right while facing the tech center, 1 being the
leftmost which is directly under the end of the top of the ramp.] If
you're the engineer at the enemy terminal, there is a pretty safe hiding
place near switch 6. Duck in there in between hacks on the off chance that
no one will notice, and you can remain there for some time. Periodically
check this spot in your own base for spies and engineers.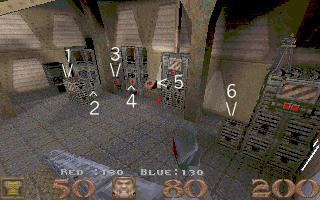
We'll start with number one. Hit the switch and you'll get "activating entrance lift". In the stair entry, there is a small one-man platform that is team-specific. If you get your partner to stand on it and then go hit this switch, he'll get to the top level, bypass the ramp, and if he's a gren or rocket jumper, save him some armor and health. Useful in some cases, but usually for only one player, since the engineer will die pretty quickly while alone in the ramps.
Button two opens the bottom refill, the one adjacent to the shaft dropping to the flag room. This is very useful for a quick refill on the way to the flag or on the flag-carrier's way out. However, it requires a degree of coordination here, probably more than it's worth. I seldom use this switch.
Button three opens the main lift door. This is a one way
door -- you can go down the shaft but not up. As indicated in Fig 10, the
main lift is located immediately next to the flag cap tile and adjacent to
the ramp room.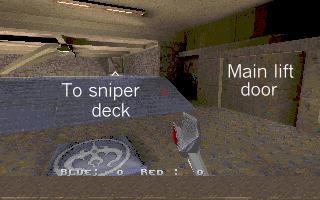 If you want to seriously mess with the enemy's mind, drop to the flag
through this door. Simply have an engineer hack button three, then hide in
the #6 spot and wait for the signal. After you take the flag, walk to the
elevator which is down the hallway with the flashing lights (to get to the
elevator you have to go up the stairway with the broken blocks at the
bottom), and give the signal to activate the back exit elevator (button
6). This will activate the elevator, taking the flag carrier to the top,
where he can make a direct escape through the ramp room or the sniper
deck. If there are no sentries in the ramp room, you're home free after
little or no work. Talk about rewarding, eh? Just goes to show you how
much teamwork makes a difference.
If you want to seriously mess with the enemy's mind, drop to the flag
through this door. Simply have an engineer hack button three, then hide in
the #6 spot and wait for the signal. After you take the flag, walk to the
elevator which is down the hallway with the flashing lights (to get to the
elevator you have to go up the stairway with the broken blocks at the
bottom), and give the signal to activate the back exit elevator (button
6). This will activate the elevator, taking the flag carrier to the top,
where he can make a direct escape through the ramp room or the sniper
deck. If there are no sentries in the ramp room, you're home free after
little or no work. Talk about rewarding, eh? Just goes to show you how
much teamwork makes a difference.
Button 4 opens the cave lift door.
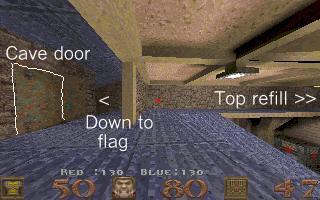 By
opening this door you provide your teammates a direct drop to the flag
area instead of having to negotiate the twisting ramps all the way to the
bottom. This is a great timesaver, and it enables you to skirt many
defenses on the way down.
By
opening this door you provide your teammates a direct drop to the flag
area instead of having to negotiate the twisting ramps all the way to the
bottom. This is a great timesaver, and it enables you to skirt many
defenses on the way down.
Miscellaneous TF tip #124: If you don't have an engineer to help you open the cave lift door for you, have the defense do it. Pretend like you're going to take the ramps all the way down, but stop after the first turn. Check to see if anyone's following you; if they're not, chances are they took the cave lift down. If you didn't wait too long, you can run back up to the top and jump down the shaft, and surprise the guy waiting for you.
Button 5 opens the top refill doors. As you'll see in Fig 11, the top refill doors are immediately above the tech center, or near the top of the ramp on the right side. If you're part of a major attack force, have some heavy support take out the sentries before you enter, then mosey on down and hack button 5 top open the top refill door. This is quite useful as it will allow your fellow attackers to reload before heading down to the flag, which is often a very daunting proposition.
Miscellaneous TF tip # 22: Enter the enemy base through their water entrance as an engineer (of course only if you're going to hack their terminals). You will come up directly under their top ammo room. Find the opening in the ceiling and toss one EMP grenade in there. If anyone's inside, they'll get totaled by all the exploding ammo, and they'll never know you were there (at least for a while). Then you have a direct entry to their ramp room through a door in the wall (in the room under the ammo room). This rocks. Ever see all that ammo go KABOOM?
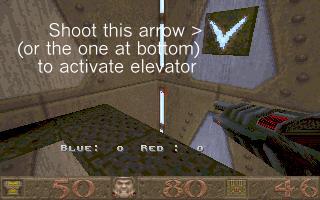
Finally, button 6 (refer to Fig 9 if necessary). This activates the rear
exit lift, which is located in the corridor between the upper respawn room
and the main lift door (all three meet where you cap the enemy flag), see
Fig 12. 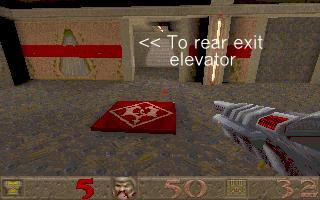 In
your own base, you can activate this elevator by shooting the arrows (Fig
13); however in the enemy base you must have the engineer hack this lift
using button 6. This is a viable flag exit way, comprable to the main exit
lift which, in order to be successful, must also have the main door opened
as well (2 buttons that have to be timed right).
In
your own base, you can activate this elevator by shooting the arrows (Fig
13); however in the enemy base you must have the engineer hack this lift
using button 6. This is a viable flag exit way, comprable to the main exit
lift which, in order to be successful, must also have the main door opened
as well (2 buttons that have to be timed right).
 Those
are the functions of all the terminals. Probably my favorite is the main
lift door (button 3) since it provides such a great way to get down to the
flag almost directly from the sniper deck. Sometimes it is possible to get
by the sentries if they're not on the top of the ramps, but if not all it
takes is one MIRV or nail grenade to demolish one, and then the engie can
open the main lift door for easy, direct access to the flag. The beauty
thing about this door is that neither team can open it from above; the
defensive team also has to hack button 6 if they want to use this shaft as
well. However it does open for people coming up the lift. For returning
the flag, I recommend using the back exit lift at the top of the broken
down stairs, accesible with button 6.
Those
are the functions of all the terminals. Probably my favorite is the main
lift door (button 3) since it provides such a great way to get down to the
flag almost directly from the sniper deck. Sometimes it is possible to get
by the sentries if they're not on the top of the ramps, but if not all it
takes is one MIRV or nail grenade to demolish one, and then the engie can
open the main lift door for easy, direct access to the flag. The beauty
thing about this door is that neither team can open it from above; the
defensive team also has to hack button 6 if they want to use this shaft as
well. However it does open for people coming up the lift. For returning
the flag, I recommend using the back exit lift at the top of the broken
down stairs, accesible with button 6.
For reference, here is a summary of all the buttons and their functions (select the text and hit ctrl-c, then paste into a word processor for a quick printable reference):
| Button 1 | Activate stair entrance lift |
| Button 2 | Opens bottom refill |
| Button 3 | Opens main lift door (direct to flag room) |
| Button 4 | Opens cave shaft/lift door |
| Button 5 | Opens top refill door (at ramps) |
| Button 6 | Activates back lift (accesible through broken stairs) |
If you view this map as a plain old 2fort map, then it's pretty drab, in addition to being extremely hard to succeed on offense without pinpoint precision and teamwork. However, if you factor in the hack terminals, this map is totally reversed in its concept and difficulty. These terminals add a whole new dimension to this map, and make it something totally unique in TF to date. Plus, it's one helluva map for the engineer.