Change the animation icon in the upper right hand corner of Internet Explorer. We offer a variety of
animations: Active Sentry Gun, Rotating PlanetFortress Gear, Quake Shambler (for Old School QTF Fans), and more.
— Drunk Amish Honky
Icon Making 101
There are only two possible reasons that you are at this page: A) you are interested in creating a progress indicator icon to display in the corner of Internet Explorer, or B) you have become lost within the vast wealth of information that Planet Fortress provides. Since I want to feel that this guide is useful, I am going to assume the former:) Upon completion of this tutorial you will have obtained the skills necessary to make your own icons for IE, so that you can add to it your own ounce of personal flavor, albeit your clan's logo, your favorite TFC class or weapon, or even something non-TFC related. Once you have made your icon, please check out the Registry Hacking tutorial, if you haven't already.
If you ever paid attention to that little progress icon, you may have noticed that it is animated while a page is loading and displays a static image once the page is loaded. In a nutshell, IE will be forced to read a bitmap, which is very similar to a strip of film, in order to produce the animation and then read a separate single-celled bitmap to produce the static "stop-image."
For this demonstration, you will produce an icon that shows the TFC flag in motion and the TFC symbol for the stop-image. This is not really all that pretty of an icon when finished, however it does serve its purpose rather well - introducing you to hacking IE. If you run into a problem at anytime while making the icon, you can download the files I created while writing this turorial in tutorial.zip. To do this, you will need the following programs:
-A paint program (Photoshop, PaintShopPro, Fireworks, etc. If you don't have Photoshop, then I would recommend Macromedia's Fireworks)
Load up HLMV and open dmredflag.mdl (found in C:\SIERRA\Half-life\tfc\models by default). Click on the sequence tab and choose "not_carried" as the motion, and hit the stop button. Set the frame to 0 and take a screenshot (Options --> Make Screenshot); continue to do this for each frame until you hit frame 9 (yes, there are nineteen frames but you'll only need the ten screenshots). For simplicity, name the screenshots something like frame0.tga, frame1.tga, and so on.
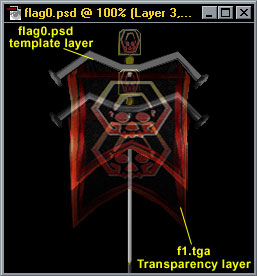
Once you have your ten screenshots, close HLMV, and open up your paint program. I will be using Photoshop 6.0 throughout this tutorial however you should find many similar features on Fireworks or any other high-quality paint program (FYI: MS Paint, is not high-quality). Unfortunately, the screenshots cannot be used as-is, so they will need to be altered to the correct size. As I hinted at earlier, the animation bitmaps are going to be one long strip consisting of several cells of 38px by 38px images and another one of 22px by 22px; the effect will be similar to that of a roll of film. Currently, our screenshots are 628 x 370. This simply will not do, so create a new picture that is 250px by 250px and crop the first screenshot (frame 0) so that it is centered in the picture. Just for a lark, change the image size (Image--> Image Size) to 22px; it's a wee bit hard to see, isn't it? Undo the resize, and adjust the contrast to 75% (Image--> Adjust--> Brightness/Contrast) to brighten up the pic (brightness is not adjusted since that would ruin the black background). Save the picture as flag0.psd, however leave it open since we are going to use it as a template for lining up the rest of the pics.
If you have ever worked with photoshop before, you should be well aware of the layer system it uses; it is this system that'll be taken advantage of to center all the pics. Crop the second screenshot (frame 1) onto flag0.psd; it should create a new layer over the first image (frame 0). Adjust the transparency to 60 and line up frame 1 with frame 0 using the flagpole as a guide. Once lined up, set the transparency back to 100, delete the first layer (frame 0), and adjust the contrast to 75%. Go to file and select Save_as, and name this file flag1.psd. DO NOT select Save or else you will overwrite flag0.psd. Follow this pattern for the remaining frames; be thankful that you didn't have to edit the other ten frames in the "not_carried" animation. When you finish, you should have ten .psd images ranging from flag0 to flag9.
Now, it's time to resize the pics to the proper measurements and compile them into the animation strip. If they aren't already, open up the ten flag.psd images. Resize each of those images to 38px by 38px. If you have constrain proportions checked, it is as simple as changing the width to 38px, since height will automatically be adjusted. I would strongly recommend saving each of 38px images as a bitmap. This way, you have the small bitmap for making the strip, and the full sized psd image in case you make a mistake or need to change something later on; I have learned this lesson the hard way. The remainder of this guide will assume you created these bitmaps.
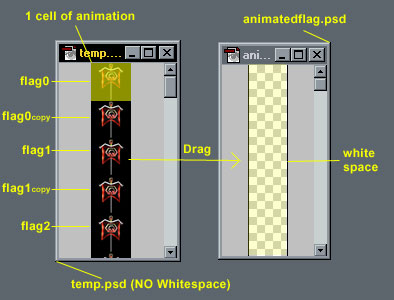
This next part is going to require a small bit of logic. Currently, the flag's animation starts in the center, then moves to the left then returns back to the center; this is a total of ten frames long. I want the full animation; center to left, left to center, center to right, right to center. Therefore, we will double our cell-count to twenty. However, after trying this out, I noticed that the speed of twenty frames goes a bit too fast; therefore we will double each cell, making it a forty-cell-long animation. Each cell in the animation needs to be 38px by 38px, so to get the final height take 38 and multiply that by 40, which equals 1520: ergo, the final dimensions of the animation will be 38px in width and 1520px in height. Create a new pic named animationflag.psd with these measurements and set the background to transparent or white. Now, we could fill this pic with cells one by one, however it is easier to cheat a bit and sidestep adding all forty cells manually to the animation. Create a similar frame, only half the height (760px) and name it temp.psd.
Take flag0.bmp and drag the image over to temp.psd. Line up the image so that it is centered horizontally (no white-space on either side) and so that it is at the top of the pic. The easiest way to do this is move flag0.bmp down until you see some white-space above it, then, gingerly, move it up until the white-space is covered up; be aware that if you go to high, the cells won't be aligned correctly. Duplicate the layer, and move the copy down so that it is directly below flag0.bmp, whereas the pics are not overlapping, and there is no white-space showing. Follow this pattern sequentially for the nine remaining bitmaps, placing each bitmap directly below the previous one and then duplicating it. When finished you should have twenty cells of animation perfectly filling temp.psd, with no white-space showing. Once everything is aligned, flatten the layers to create a single image, (layer--> Flatten image). Drag the flattened temp.psd over animationflag.psd and line it up at the top. Go back to temp.psd and flip the image horizontally (Image--> Rotate Canvas --> Flip Horizontal). Re-drag the image over the remaining white-space of animationflag.psd. Once again, line it up so no white-space is showing and save the image as animationflag.bmp. Finally, with constrain proportions still checked, change the image width to 22px and save this as animationflag_small.bmp. Place animationflag.bmp and animationflag_small.bmp in your Windows directory (C:\WINDOWS\ by default) and pat yourself on your back since the hardest part is now behind you.
The Stop Image
There are two methods that Windows uses to produce the static image displayed on your browser after all
activity ceases; the first of which uses the top cell of the animation bitmap. This is fine if you are using
a looping image, but what happens if you want an animation for loading to play, then a different screen to
appear for the stopped image - if you use this method, the animation would be broken up by the image on the
stop cell each time it would cycle. In such cases a second method is used to display the stop image; one that
forces Windows to accept a 38px by 38px or 22px by 22px image to be the stopper.
Once you create this image, full details on how to impliment it is covered in the
Registry Hacking Tutorial, I merely
wanted to bring the point up just so that you are aware of it.
For the purposes of this tutorial, the TFC icon will be used as the stop image. I already went through the trouble of converting the icon into a bitmap, so you don't have to. Right-click on the following two images and Save Picture As
tfcicon_large.bmp and
tfcicon_small.bmp.
Place these two files in your Windows directory as well.
Note: Windows XP
For some odd reason Windows XP seems to double the animation speed when using Internet Explorer. If you are an
XP user, or are making the icons to be distributed around the net, you may want to add a quick fix for the
animation icon. Basically, just double each cell in the animation bitmap. So with the flag example, instead of
having flag0.bmp, flag0copy.bmp, flag1.bmp, flag1copy.bmp and so on, you would use the order of flag0.bmp,
flag0copy.bmp, flag0copy.bmp, flag0copy.bmp, flag1.bmp, flag1copy.bmp, flag1copy.bmp, flag1copy.bmp and so
on. If you are not experiencing this problem, and are just making the icon for personal use, then you
shouldn't have to worry about this fix.
Conclusion
If you've gotten this far, you should have yourself a proper set of images for your very own custom icon. One of the last tips worth mentioning is play around with the number of cells to make the animation smoother. You'll probably notice that the flag icon is rather choppy, feel free to edit the number of cells to smooth it up; I only used 2 cells for every frame of animation to make the guide simple and easy to follow. If you need more example for any reason, you can scrummage through our library of custom images found at the bottom of the
Registry Hacking Tutorial. If you have youself
a cool icon that you believe others would enjoy, send us a link
so we can check it out, then add it to our library (with proper credit to you, of course).

 tfcicon_large.bmp and
 tfcicon_small.bmp.