SETTING UP YOUR VIEWPORTS
Okay, the first thing to do is configure your viewports.
I generally have the default configuration like this:
Top left - top view
Top right - left view
bottom left - front view
bottom right - perspective view
you can configure them any way you want, whichever is easiest for you. If they
aren't configured the way you want them then this is how you change them:
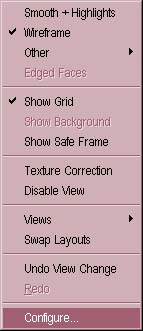
Right click on the name of the viewport. For example, in the 'perspective'
viewport you will see the word, 'perspective' in white in the top left of the
viewport. This is the viewport name and this is where you should right-click.
You should get a drop-down menu that includes the command 'Views'.
Click on 'Views' and you will be given a second list of all the different views
available (including any cameras that you might have created - though, if you
are just modelling, you won't need cameras).Select the one you want by clicking
on it and the viewport will automatically change to that view.
Also, if you want a different configuration than the standard four viewports,
then right-click on the viewport title and select 'Configure'
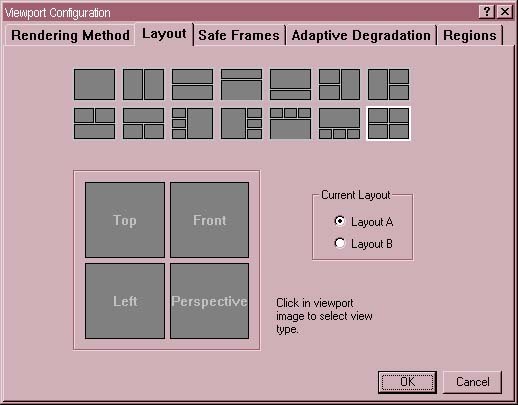
This will bring up a general preferrences menu and if you select the 'Layout'
tab you will be able to choose how many viewports you want and what size. My
friend usually makes humanoid shapes and so he has two screens, 'front' and 'left'.
When I am making aircraft, I like to have the standard four, 'top', 'left',
'front' and 'perspective'.
To choose a different layout, click on the smaller icons to select the ammount
of viewports you want on screen and what shape. Then the larger display will
change to the configuration you choose. Then in the larger display, right-click
on each viewport panel to select which view you wish to use.
SETTING UP YOUR MODIFIER BUTTONS
It is possible to customise many parts of Studio MAX and for the sake of
convenience, we will do so here. Two of the most important modifiers for
TF2 modelling are the Edit Mesh modifier and the UVW Unwrap modifier. So we
will now add these two modifiers to our list of modifier buttons.
Click the Modifier tab in the top right:

Now you will see a tiny icon in the top right of the modifier rollout that looks
like this:

Click this button and you will be presented with the following window: This
allows you to customise your modifier button setup. raise the 'total buttons' by
two, so that you now have twelve buttons. This will give you two new blank
buttons at the bottom.
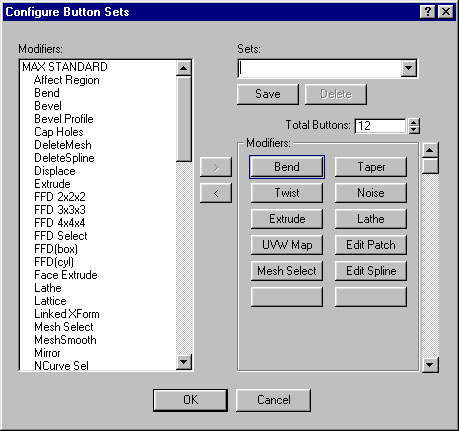
Select the first button, by clicking on it. Now go to the list on the left and
slide it down until you find the 'Edit Mesh' modifier in the list.
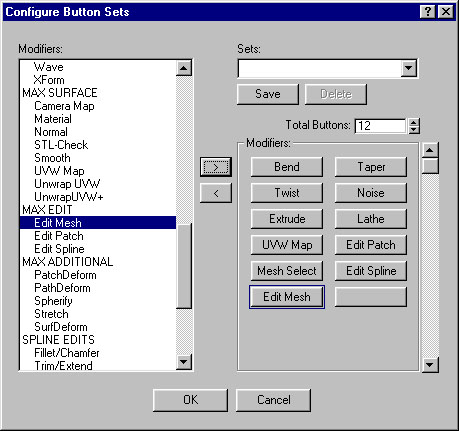
Select it by clicking on it once. Now you can see two arrow buttons between the
list and your new button configuration. Click the 'right' arrow to add the Edit
Mesh modifier to your buttons. You will see the words 'Edit Mesh' appear on one
of the new buttons. Now select the other new blank button, by clicking on it and
find the 'UVW Unwrap' modifier in the list (note: Not to be confused with 'UVW
Map' which is allready on your buttons). Repeat the above process with the UVW
Unwrap modifier.
Now save the new key configuration by typing a name for your new configuration
in the top-right box and click 'SAVE'.
Once you have done this, we are ready to start modelling!
Tutorial created by Scarecrow,
THANK YOU !!!
©
http://www.Planetfortress.com/TF2Models
TF2 is trademark of Valve
Software and of Sierra Online.
© 2000 TF2 MODELS - Hosted by Planetfortress
Web designer/Webmaster : IXNAY