SKINMESHING IN STUDIO MAX
...with the help of my glamourous assistant,
Gordon
Skinning the mesh, in MAX is initially a bit more complex than it was in, say
Quake2 Modeller. I used to make Quake2 models and skinmesh them using Quake2
Modeller. In that, you needed only to set the size of your skin and then take
each section of faces and arrange them on the blank, black skin. From there
you'd copy the image to a pcx and colour it in, making sure not to go over the
lines. No problem.
The task of skinning in MAX is remarkably similar but as you can't arrange all
of the faces at once it means you need to make some sort of outline before you
start - this is a fairly complex and daunting task and requires practice.
So, what I generally do is designate my sub-groups first (more later) and then I
sit down with a good, old-fashioned pencil and paper and I draw a square and
roughly plot where each subgroup will be laid on the skin. Then I make the skin
first!!!.
SUB-GROUPING YOUR MESH
Sub-groups or 'ID groups' are similar to the grouped areas of
triangles on a Quake2 skin. You assign subgroups so that those areas can be
individually skinned later on, in the same way as you would take small areas of
a quake skin and skin them individually, to avoid stretching on the model.
Divide your mesh up the same as you would a Quake2 model. (I think you get the
idea).
Select your mesh and collapse the 'stack' so that it becomes an editable mesh.
Do this by clicking the modifier tab:

Find the stack symbol half way down the rollout on the right hand side:

Click the button and you should get this window:
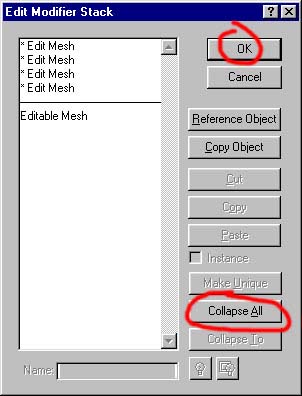
Click 'Collapse All' and then 'ok'. You will get a warning that this is
irreversible. Click 'Ok'
To explain, a model is made up of the base object it was initially constructed
from and deformed by a series of modifiers. The 'Stack' lists these modifiers.
By going to various modifiers in the stack, you can adjust them so as to adjust
the effect of modifiers further up. What you have just done by 'collapsing' the
stack is permanently make those changes to the mesh, simplifying the model (and
making it a little more stable). The model is now an 'Editable Mesh' and only
this will be listed in the stack. The difference between 'Editable mesh' and 'Edit
mesh', if you are wondering, is that 'Editable Mesh' describes the model's state,
whereas 'Editable Mesh' is a modifier applied to the stack. They both allow you
to do the same thing, though.
Activate the sub-object button and select 'face'.

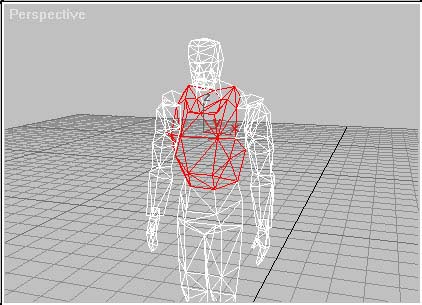
Select the faces you want to be in sub-group one by either individually clicking
on them or dragging a box around them. Selected faces should highlight red.
If you pick up any unwanted faces, deselect them by holding down the ALT key and
clicking them or dragging a box around them.
I usually start with the chest.
To designate the sub-group, slide the right-hand side parameter rollout up until
you see 'ID:' with a white box next to it:

This may allready have the number 1 in it. No matter, click in the box to place
a cursor. Type '1' (if it's not allready there) and hit 'return'. The sub-group
you have selected is now subgroup 1. Repeat this with the next group (for
example, maybe select the model's back now). This time type '2' in the ID box.
repeat this until all faces are done.
Some tips:
To give you an idea of how I usually group a model, here is a typical list of
the divisions I usually make in a Humanoid model:
chest, back, arms outer, arms inner, legs outer, legs inner, face, head left,
head right, foot top, foot bottom, foot sides, hands top, palms. Neck front,
neck back.
Obviously you can make whatever subdivisions you want and name them what you
want, this is just a suggestion.
All faces are initially designated sub-group ID:1 by default. So that even if
you select just the chest and call it ID1, and then select group ID1, virtually
all of the model will be highlighted. To get around this, I usually start by
selecting the whole model and designating it an ID number that I know I'm not
going to use - something ridiculously high like 60. Once the whole model is
assigned as group 60 you can set about reassigning the sub-groups as 1 and 2 and
3 etc etc, without unassigned faces getting in the way. Then when you select
group 1, you should only have group 1 show up =) (more about reselecting
assigned ID groups in a minute).
Keep a list of which areas are designated what number, for example
1 chest
2 back
3 outside leg left
etc etc... This will help later on when applying skinmaps.
After you select and designate each group, hide it. You will see some buttons
just above the ID box, which include the 'hide' and 'unhide all' buttons:
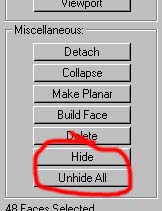
This will hide all selected triangles in a mesh. This way, as you designate each
group, you hide the group and if you missed any triangles, they'll still be
visible. One thing to note though, is that the only way to unhide them is by
pressing the 'unhide all' button which will do exactly that. So, what I usually
do is that, when I click 'hide', if there are any mistakes, instead of 'unhide
all' I click 'undo'.
Now is a good time to make the skin, you know what subgroup areas you have and
you should be able to make a rough layout on paper and make the skin. You will
need some sort of skin before you can proceed anyway, even if it's a rough
outline.
MULTI-SUB OBJECT TEXTURES
...and applying the skin
Next, I set up my multi-sub-object texture with the same amount of layers as
there are subgroups in my mesh. A multi sub-object is a collection of textures
represented as one single texture. Ordinarily you would have one texture per
sphere, a Multi-Sub Object has many layers, each layer has it's own texture
qualities.
Create a Multi-sub-object to skin your model this way:
Open the material editor using this button on the top row.:

Select a texture sphere in the material editor. The first one is perfectly fine.
Click the 'create new' button on the extreme left of the buttons under the
spheres.

You will see this window:
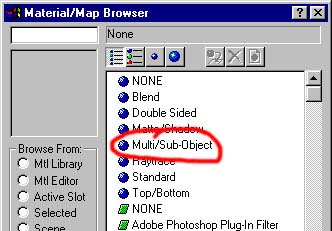
Select 'Multi-Sub-Object' from the list on the right.
set the 'number of materials' to the same ammount of sub-groups in your model.
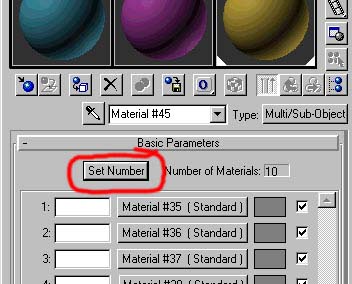
Let's say you divided the mesh into twenty sub-groups. Then set the 'number of
materials' to twenty. You will now have twenty layers to the multi-sub-object
texture. The layers are represented by rows like this:

...and you will see them stacked one on top of another on the top layer of your
multi sub-object texture. By default, the top row is texture one (regardless of
what it states in the buttons) and is automatically assigned to sub-group 1. The
next row down is layer 2 and is automatically assigned to sub-group 2 on the
model and so on...
Now lets say for the sake of this tutorial, that sub-group 1 is the chest. Click
in the first white box and type 'chest' -This is just labelling to keep track of
what that layer is for.

Now click the button with the word 'Material...' on it. The window rollout will
change:
Go down to the 'Maps' bar.

The maps rollout will open:
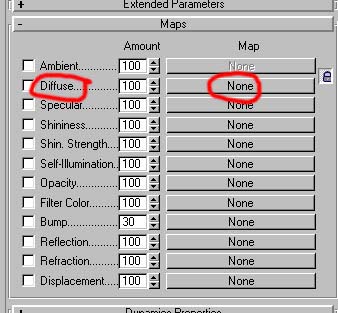
Click the button labelled 'none' next to 'Diffuse' in the maps rollout. Select
'Bitmap' from the list which will now appear.
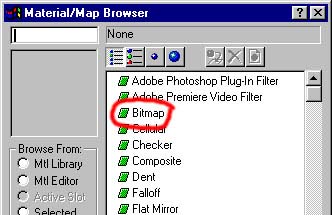
You may be familiar with this new rollout - it's the standard bitmap material
settings.
Now click the long blank bar about halfway down...
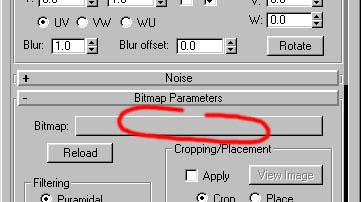
...and select the bitmap image that has the models' 'chest' on it. (yes you can
assign different bitmaps to each layer, which means you can use multiple skins
for each model).
Now click the blue and white checkered box at the top of the rollout under the
spheres.

This is telling MAX to show the skin on the model in the viewport (provided you
have smooth and highlights selected). There is a box like this on every layer so
each sub-group can be shown or not. I generally have all layers active. Now
click the black 'up' arrow:

You go up a level to the maps rollout again.
Now click it again - you go up to the top level. Now repeat the process for
subgroup2, typing in the second row down, the name of the sub-group for layer
two and choosing the skin relevant to sub-group 2.
When all of the layers are set up, apply the texture to your model by making
sure your model is selected and clicking the apply button on the material editor:

Layer 1 will, by default be automatically applied to subgroup1, layer 2 to
subgroup2 and so forth.
It will be a mess.
ADJUSTING THE SKIN TO FIT
Now you need to go through each subgroup, applying an 'Edit Mesh' modifier set
on 'face' sub-object, select the subgroup you want to work with, leave the
sub-object open and apply a UVW map, align the UVW so that it is adjacent to the
sub-group of faces, then finally a UVW unwrap, so that you can arrange the faces
on the skin image. Okay, here we go...
STEP 1
To begin, select your model and apply an 'edit mesh' modifier. Now go to the
'face' sub-object and slide down to the ID box again
DO NOT TYPE ANYTHING IN THIS BOX THIS TIME OR
YOU WILL SCREW UP YOUR SUBGROUP ASSIGNMENT.
You will see a small button underneath the box saying 'Select by ID'
Click this and a small dialogue box will appear in the middle of the screen:
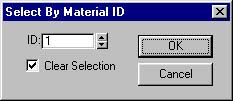
Type '1' into it (if it is not already there), and hit return. Subgroup1 should
now be selected (highlighted in red) and NOTHING ELSE. If this is not so then
something has happened to your sub-group assignments and you need to go back and
sort them out before you proceed (you WON'T have to redo the multi-sub-object
texture, unless you change the order of the sub-groups).
STEP2
LEAVE THE SUB-OBJECT BUTTON ACTIVATED (yellow)(this is important or this will
not work), and apply a 'UVW Map' modifier.
Now you need to activate the UVW map's sub-object button and align the UVW map.
The UVW gizmo will appear initially as a brown rectangle with a spike sticking
out of one side.
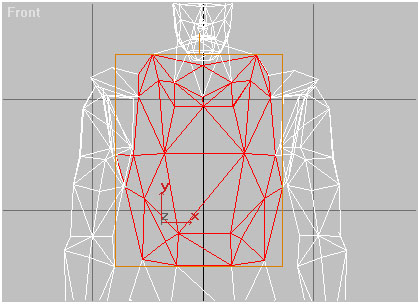
When you click the sub-object button, it will turn yellow with one green edge.
The rectangle represents your skin image. The green edge represents the
right-hand side of your skin image and the 'spike' denotes the top of the image.
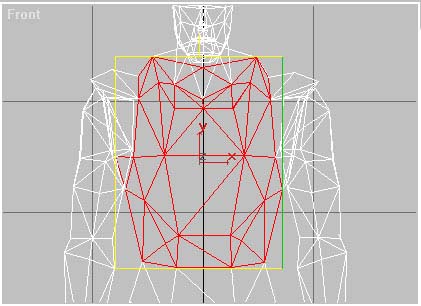
We need to rotate and move the 'gizmo' so that it is as flat-on to your selected
area as possible and so that it fits exactly to the edges of your selected area
as possible (regardless of the image it represents). The green edge and spike
will help you orientate it so that it is the right way up and the right way
round. This is made easier by the 'view align' buttons and 'fit' buttons.
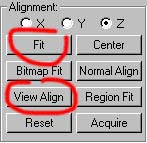
Select a viewport which displays your faces as flat on to you as they will go
then click 'View Align' and 'Fit' which are both at the bottom of the UVW Map
rollout on the right-hand-side. The uvw planar gizmo should now be in perfect
position. It might be upside down (the spike sticking out of it at the bottom).
If so, in the view you selected, rotate the gizmo 180 degrees so that the spike
sticks out at the top). Now deactivate the UVW MAP sub-object button (it's only
the 'edit-mesh' sub-object button that needs to be left activated).
STEP3
Now appy a 'UVW Unwrap' modifier. If you haven't added this to your modifier
buttons (see tutorial one - 'Setting up your workspace), you should find this if
you click the 'More' button at the top of the modifiers.
You will now see a whole new rollout on the right hand side. You will also see a
big 'Edit' button.
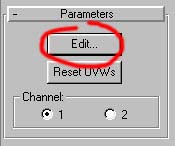
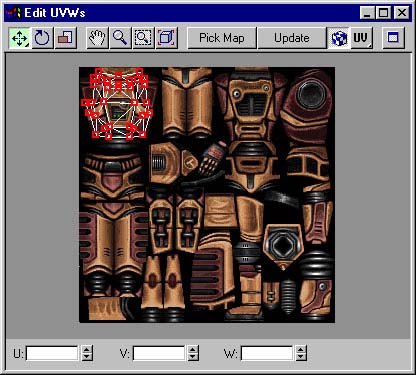
Click 'EDIT' and you will be presented with a new window in the centre of the
screen. It will have a square with your selected faces in the centre of it.
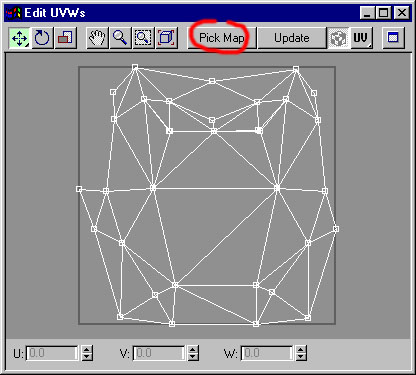
You now need to select the skin with the relevant image for the group you are
working on. You do this by clicking the 'pick map' button.
TIP: When you click 'PICK MAP', you will be presented with a list:
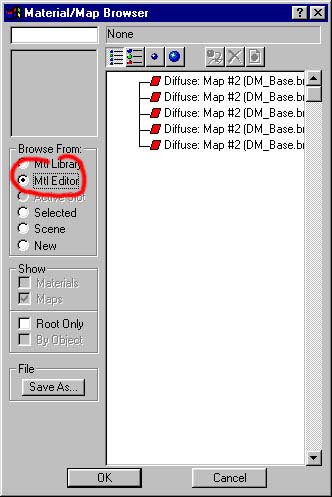
On the left hand side, you will see a list of sources. Check the 'Mtl Editor'
radio box and you will see a list of materials on the right, from your
multi-sub-object texture. Pick the relevant one by double-clicking on it.
In our example above we decided that the model's chest would be sub-group1.
Let's say we are working on sub-group1, you need to pick the map with the chest
image on. If you are using just one skin for the entire model then you will
always pick the same one.
You will now see the image you chose in the square. If the skin-image you are
using is not square, it will be distorted to fit. This is not a problem, it will
look fine on the model.
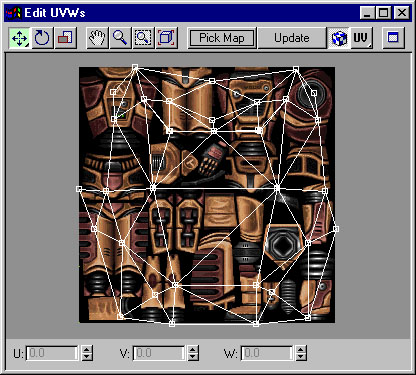
Now arrange the vertexes to fit on the area of skin relevant to them. You will
need to shrink and adjust them by hand to fit on the 'chest' area of the bitmap.
TIP: Select a viewport (the 'perspective' one is good) and make sure 'smooth and
highlights' is set (by right-clicking on the viewport's title). Now move the UVW
unwrap window so that you can see the 'perspective' viewport.
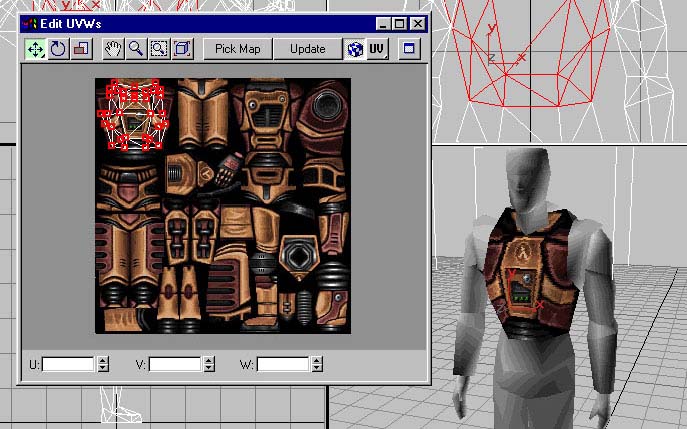
As you adjust the vertexes in the UVW unwrap window, you will see the skin
adjust on the model in the viewport.
Once you are done, shut off the UVW Unwrap window and apply a new 'edit mesh'
modifier and go back to STEP 1 and repeat for subgroup2 and 3 and 4 and so
on....
This process is repeated for each subgroup, until the model is skinned.
Tutorial created by Scarecrow,
THANK YOU !!!
©
http://www.Planetfortress.com/TF2Models
TF2 is trademark of Valve
Software and of Sierra Online.
© 2000 TF2 MODELS - Hosted by Planetfortress
Web designer/Webmaster : IXNAY