A BRIEF EXPLANATION OF BIPEDS AND
PHYSIQUE
Character Studio is made up of two essential halves: Biped and Physique.
The best way to think of the Biped is as a wireframe skeleton similar to those
used in rubber, stop-motion puppets. The biped is a predefined series of bones
in the shape of a human. Physique is the method of attaching the Biped to your
model and using it to animate the mesh, which would otherwise be impossible. The
only other package I know of that can accomplish this is 'Bones Pro', but
unfortunately, Bones Pro will not work with HalfLife. Character Studio does a
myriad wonderful things but we will only need the Biped and the Physique
modifier.
CREATING A BIPED
Well, you can create your own Biped, but I know myself that I originally did
this with my conversion of the Quake2 Marine and it caused several problems.
Firstly, When you eventually come to compile your model, the Studiomdl.exe
program expects to find specific bones with specific names. If you alter this
the model will look a complete mess. For me, the Quake2 marine worked perfectly
in the Model Viewer but When I viewed him in the game, his legs didn't animate!!!
The solution? Well, What I did then is simply open the Gordon model from the
Valve SDK and delete the Gordon Mesh. This left me with what I call the Valve
Biped. It's basically a Biped which has been configured by Valve themselves so
you can guarantee it'll work. This is what I suggest you do too.
ARRANGING THE BIPED READY FOR
PHYSIQUE-ING
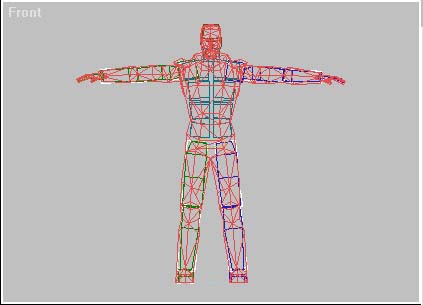
I generally arrange the biped so that it's arms are straight out at the sides
and the legs are slightly parted.
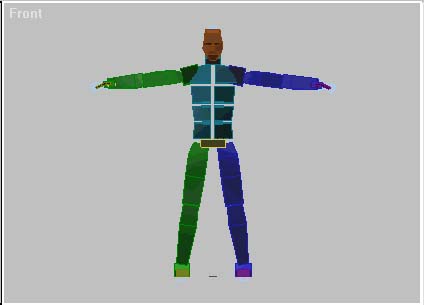
This is because it makes life easier later on when you are editing the assigned
vertexes to the biped.
You will need to adjust your mesh to fit the biped.
NOTE: Always adjust the mesh you have made to fit the biped, do NOT adjust the
biped. If you adjust the biped's shape or proportions then it will not conform
with Valve's biped in the SMD animations (see the later tutorial on compiling
your model), and it will deform in the game. You can however, safely move/rotate
the limbs to fit in your model, this is only movement, not 'rescaling' and will
not affect your mesh.
To arrange the biped, you need to go into 'Figure mode'. Select Bip 01. This is
the diamond in the center of the Biped's hips.
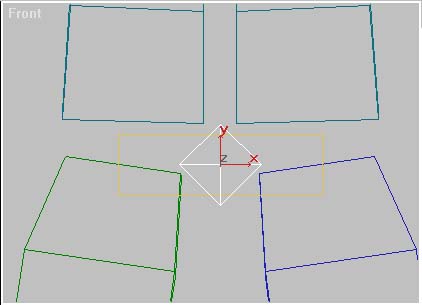
This is the root of the Biped and the core bone to which all others are linked.
Half Life also uses this particular 'bone' to position the model in the game. If
you are having trouble selecting it then you can select it, as with all objects
in Studio MAX by going to the top of the screen and clicking the select button:

You will be presented with a list.
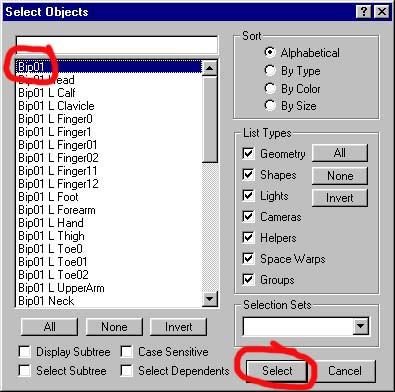
At the top, should be 'Bip 01' click on it and click 'Select'.
TIP: To avoid deselecting it, you can lock the selection, by clicking the 'padlock'
at the bottom of the screen.

While this button is activated (yellow) then you cannot select anything else and
you cannot deselect what you have selected. Simply click it again when you wish
to deactivate it and release your selection.
Now go to the 'Unicycle' tab in the top right and you will be presented with the
Biped rollout (Max 2.x only).

Halfway down is a row of three buttons. One on the left is a cute little guy
with his arms out.
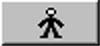
Click it.
This is 'Figure mode' The biped might move. Don't worry. In 'Figure' mode, the
biped will return from it's current positon, wherever it is on the screen, to
the position and shape it was when first created. For the Valve Biped this is
slightly forward of centre with it's arms by it's sides and legs together.
An explanation: Figure mode allows you to permanently adjust the size, shape and
position of the biped, stretching, rotating and moving and adding extra links to
the biped construction. Any changes you make will effect the biped when figure
mode is deactivated. However the same is not true in reverse. Any animation you
make to the biped in 'normal' mode (figure mode deactivated), will not affect
the biped in 'figure' mode.
Okay, in 'Figure Mode' rotate the arms and legs so that they face directly
straight out. You don't need to click the 'Animate' button for this, the
adjustments are automatically recorded.
Some tips:
Biped rotations don't work the same as general view rotations. Z usually rotates
from the side (ie: legs forward/backward) and Y usually rotates from the front (ie:
arms out and in) and X usually rotates from the top (ie: head rotating),
regardless of which view you are working in. It's frustrating but you'll get
used to it. It also means you can work in the perspective or 'user' views. You
may find that certain joints will simply not rotate in a certain direction. This
is unavoidable due to the limitations on the biped links. However, at this point
we only need to rotate the arms and legs sideways and they WILL rotate using the
Y setting for the rotate tool.
Select the rotate tool and restrict it to 'Y'. Now choose the 'front' viewport
so that the Biped is facing you. select one of the upper arms and rotate. The
whole arm should rotate clockwise and anti clockwise. Rotate it up to point out,
similar to the image at the top of this page.
Once you have rotated one arm and you are happy with it, click the 'copy posture'
button. You will find it on the right hand side rollout under the bar titled, 'Keyframing'.

...and then click the 'paste opposite' button, underneath and across one to the
right.

The other arm will spring to mirror the first. This saves time and makes your
biped symmetrical. Do the same with the legs. Until your Biped is arranged like
this:
Now you need to adjust your mesh to fit the Biped before we apply the Physique
modifier. This is a case of editing your mesh by moving vertexes in Sub-object
mode. Get the knees and shoulders in the right place. Resize the hands to fit.
Get the neck in the right place and size the head so it fits. So on and so on.
The biped is not very forgiving so you need to be reasonably accurate. Don't
worry, none of this will affect your UVW skinmeshing.
Now I will need the assistance of my glamorous assistant, Gordon.
PHYSIQUE
Here you can see the Gordon mesh fitted on to the biped. Obviously he didn't
need adjusting because he already fits it, but your model should fit as snuggly
as this if you can manage it.
NOTE: The mesh is only red because that's the colour I chose for it.
Physique is the other major half of Character Studio and it is essentially a
modifier that you apply to the model mesh the same as 'Edit Mesh' or 'UVW Map'.
Applying the modifier is easy, it's the sorting through the vertexes later that
is arduous.
Okay, Once you are happy that your mesh and the biped are in the right place,
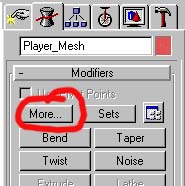
Select the mesh by clicking on it and apply the Physique modifier. If you
haven't added it to your modifier buttons (see the earlier tutorial, 'setting up
your workspace'), then you will find it by clicking the 'more' button at the top
of the modifier rollout.
and selecting 'Physique' from the list:
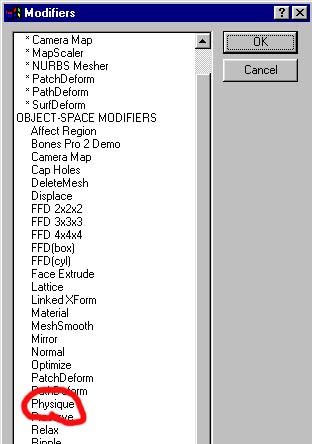
...and click okay.
You will now be presented with a rollout on the righthand side like this:

This is the Physique modifier rollout. As usual this does lots of wonderful
things, but we need only be concerned with the initialisation button which is
the funny little guy with the red stomach:

Zoom in to the waist of your model so that you get a clear view of the Bip01
Pelvis bone (the yellow box at the biped's hips).
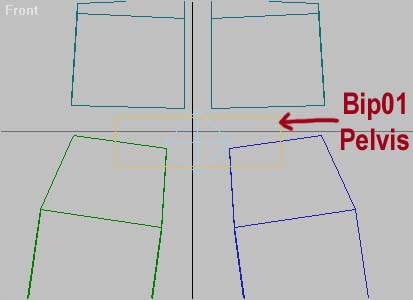
Now click the initialisation button and then click on the Bip01 Pelvis bone.
What you have just done is told Studio MAX which bone you wish to attach the
mesh to and also where it should radiate the Physique wireframe from.
You will now be presented with this window:
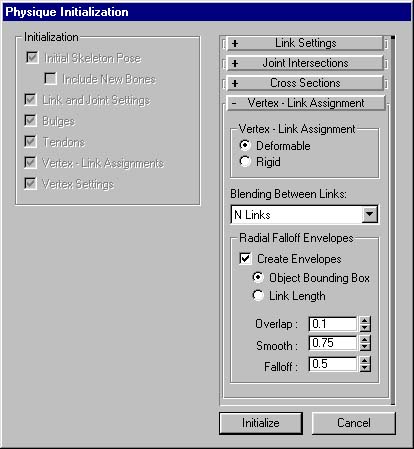
You must make the following alterations: Where it says 'Vertex Link Assignment'.
You must change it from deformable to Rigid, by checking the radio box.
Where it says 'Blending Between Links', you can see a box with the words, 'N
Links' in. Drop this list down and select 'No Blending'.
Finally uncheck the box saying 'Create Envelopes'.
Your window should now look like this:
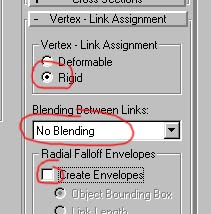
What you have just done is configure the physique settings so that each vertex
is assigned solely to one bone. It is possible in more advanced settings to have
the vertexes shared by multiple bones for smoother mesh deformation, but this
does not work in Half-Life so it does not concern us here.
Click the 'Initialise' button at the bottom and the window will disappear. Your
mouse pointer should change to a cup of coffee while it ponders how to apply the
physique. After a few moments, you should get an orange wireframe running the
length of your model:
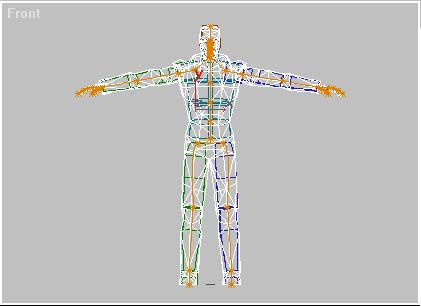
Congratulations. Your model is Physiqued. Now the hard part: Hunting down and
re-assigning the stray vertexes.
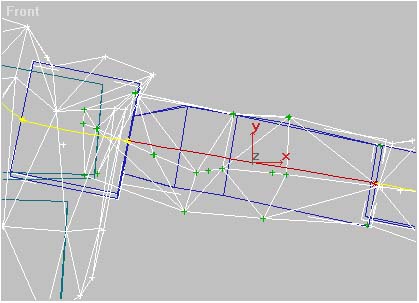
EDITING THE PHYSIQUE MODIFIER
So now we have a mesh which has been attached to the biped. What physique has
done is taken each vertex and assigned it to the closest 'link'. Links are the
elements of the orange wires now running through the model. if you look closely,
the orange wire-skeleton is divided up by small stars. This denotes the
beginning and end of each 'link' in the orange wire-skeleton.
Now, obviously Physique will have made some mistakes, check how the vertexes
have been assigned by selecting the limbs on the biped and moving them (remembering
to use 'Undo' to reset them afterward). You will almost certainly see vertexes
moving where they shouldn't and others left behind, causing the mesh to stretch
like toffee.
So we need to go in and re-assign stray vertexes to more appropriate 'links'.
make sure you are in modifier mode...

and your model is selected. You should see the physique rollout on the
right-hand side.

Activate the sub-object and where it says, 'Envelope' drop the menu down and
select 'Vertex'

You will now see all the vertexes all over the model as if you were editing the
mesh. You will also notice that the orange wire-skeleton has turned yellow.
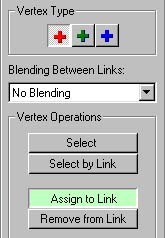
Slide the rollout on the right, all the way up so that you can see it properly:
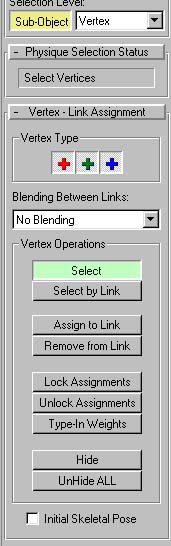
You will see that the 'Select' button is already activated. If not, then click
it so that it goes green as shown above. Also notice that the 'Vertex Type'
buttons (the red, green and blue cross buttons) are all selected. This is how we
want it. What this means is that we are in 'Select' mode and we can now select
the vertexes that we want. The red, green and blue vertex type buttons denote
which types of vertex we can select.
To explain: Physique, as I said earlier can be set so that two or more bones can
share the influence over a vertex. These vertexes are usually coloured red.
Vertexes that are assigned to one bone only are called 'rigid' and are coloured
green. Vertexes that are not assigned at all are coloured blue. Due to the fact
that we assigned the physique as 'Rigid' then all vertexes will be assigned
rigidly to a single bone (most likely the nearest to them). This means that all
vertexes should be green. We will leave all three vertex buttons activated
anyway, just to be on the safe side =)
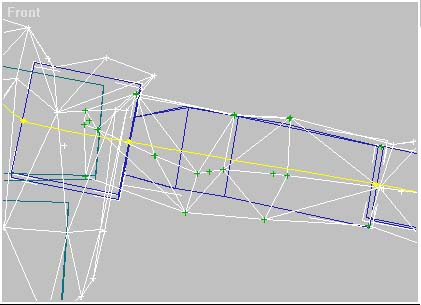
Okay, look at this view. It's a closeup of Gordon's arm. I'm going to select all
the vertexes that I want to attach to the arm 'link' and then assign them. This
is how it's done:
firstly, in 'select' mode with all three vertex type buttons activated, I select
the vertexes I want in the same way that I would if I were editing the mesh, by
either clicking on them individually while holding down the CTRL key or by
dragging a box around them.
As you select vertexes they should light up green.
Once you are satisfied that you have selected all the vertexes that you want to
attach to the particular link, then you need to switch modes. Underneath the 'Select'
button you will see another, titled 'Assign to link'
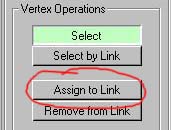
Click this button and you are now in link assigning mode. You will now notice
that the 'Vertex Type' buttons have changed. Only the red vertex button is
activated.
If we were to assign vertexes to the link with the red button activated, the
vertexes would be red, meaning that they would be shared or 'blended'. You need
to click the green vertex button.
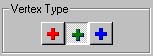
This will then deactivate the red button. Now if we assign vertexes to a link,
they will be assigned as green or 'rigid' vertexes.
All you need to do now is, making sure you are still in 'Assign to Link' mode
and click on the link that you want to attach your selected vertexes to. The
link should turn red.
Now test wether you got it right by deactivating the sub-object and select the
biped link and rotate it (remembering to reset it afterward using 'undo'). If
the correct vertexes move then you have been successful. If you still have
vertexes mis-behaving then make a note of which ones they are and go back into
the sub-object and assign it, as you just did the others.
NOTE: You may have vertexes attached to your link that you don't want attached,
they can be ignored until you get around to re-assigning them to their relevant
link. I personally find that with the biped arranged as I suggested at the top
of the page, you should only have a tangle at the shoulders, groin and hands.
Once you have been through and assigned your vertexes as 'rigid', green vertexes
to their relevant links, and tested the biped for any mistakes, you are ready to
compile your model into a Half-Life MDL...
Tutorial created by Scarecrow,
THANK YOU !!!
©
http://www.Planetfortress.com/TF2Models
TF2 is trademark of Valve
Software and of Sierra Online.
© 2000 TF2 MODELS - Hosted by Planetfortress
Web designer/Webmaster : IXNAY