BLENDED
ANIMATIONS
One of the unique new things
with Half Life animation is the blending technique employed by the game engine.
A blended animation consists of two positions of extreme angles that the engine
will combine to produce an end result corresponding with the position of the
player's crosshairs.
For example, you will notice that all weapon animations have a REF_AIMUP and
REF_AIMDOWN animation. The REF_AIMUP animation depicts the player model skeleton
aiming the weapon up at a 45 degree angle. The REF_AIMDOWN animation depicts the
skeleton aiming the weapon down at a 45 degree angle. Now depending on where the
player's mouse crosshair is pointing, the computer will 'blend' the two
animations so that the player model aims the weapon exactly where the player is
aiming the weapon.
In addition to this, The animations for the upper half of the body are blended
with the animations for the legs. So, for example, the game can mix the
ref_aimup_shotgun animation for the upper torso with the run animation for the
legs. What this means is that whatever you do with the legs in an upper-torso
animation is irrelevant because they are ignored by the engine. Similarly
anything you do with the upper torso in a legs animation (run, walk,
crouch_moveforward), is also ignored by the engine.
Each weapon has the following animation files:
ref_aimup_weapon
ref_aimdown_weapon
ref_shootdown_weapon
ref_shootup_weapon
crouch_aimup_weapon
crouch_aimdown_weapon
crouch_shootup_weapon
crouch_shootdown_weapon
The ref files are used in conjunction with the stand leg animations and the
crouch files are obviously their crouching equivalents.
To make a ref_aim animation, is very similar to making an idle animation in the
previous example. You simply need to pose the figure aiming the weapon in the
relevant direction and make the skeleton breathe. Aim cycles are also 31 frames
(0-30).
It is possible to include the weapon model in the MAX file with the biped to
help with getting the arms positioned correctly. You can even export the model
with the weapon included because anything that is not included in your reference
SMD when you compile the model will be ignored by Studiomdl. If you open one of
Valve's MAX files from the SDK (from Wavelength or Planet Half-Life), you will
see that the weapon models are included in the MAX files but they are 'frozen'
FREEZING
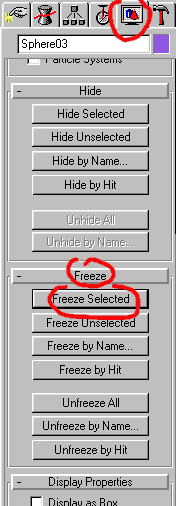
Freezing is the practice of making an object not selectable.
IF you go over to the 'Display' tab on the right and scroll down, you will see
the 'freeze' bar.

It will more than likely be unfolded, so click the bar to extend the rollout.
You will see a button titled, 'Freeze Selected', clicking this will 'freeze' any
object that you currently have selected. This means that they will be rendered
dark grey and will be not selectable. It just gets them out of the way while you
concentrate on the animation. This can be done with all objects. To unfreeze the
frozen objects, select 'Unfreeze All'.
FIRING
Alright, we have simple animation down-pat, now it's time for
something a little more complex. So far we have dealt with slow, subtle
animations. Now we need to be more dramatic and sudden. Let's make the 'ref_shootup_shotgun'
animation
If you have the SDK, open the REFERENCE_SHOTGUN.MAX. You should see a biped with
the shotgun linked to it's right hand in a neutral pose. If you don't have this
file, then create a rifle-sized box and link it to the model's right hand as if
it were an extra bone, at just the right position for the grip to be in his
hand.
Next step is to set the time to 6 frames in the same way as we set it to 30 in
the first example. We are only using 6 frames here, now because it is a much
faster and more sudden movement.
Now activate the animation button and position the skeleton aiming the shotgun
up at about 45 degrees.
Making sure the slider is all the way left and you have the whole skeleton
selected (don't worry about the weapon if it's frozen, it doesn't need to be
selected). Right-click on the slider to set the keys at frame 0. Slide the
slider to the right and set the end keys, copying them from frame 0, as we did
in the first example.
Now, we need to create a firing recoil motion. If, as with the breathing
animation we set the animation keys in the middle, the movement would be even,
balanced and smooth. We need to create a more sudden movement and a slow return
to the start position, to emulate the sudden recoil and relatively slow recovery
of firing a shotgun.
The closer keys are to each other, the faster and more sudden the movement
between them will be.
Move the slider to frame 1. Make sure the animation button is active and now
reposition the arms back a short way to look as if the skeleton has just fired
the gun. Now, provided you did set the end keys copied from the start keys (frame
0), you should be able to play the animation and the shotgun will suddenly
recoil in the skeleton's hands and then slowly return to the start position.
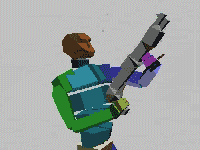
Something like this:

It'll probably need work, tweaking the hands at points to stop them moving
through the gun, or to make the gun move more convincingly, but you should be
able to do that now. Remember, with the animate button activated, any movement
or rotation you do to a bone, or any object for that matter, creates a key at
that point.
Well, that about covers two-thirds of the animations. The weapon animations do
take up a fair-sized chunk of the 106 animation files. However, the most
challenging and more interesting animations are yet to come...
Tutorial created by Scarecrow,
THANK YOU !!!
©
http://www.Planetfortress.com/TF2Models
TF2 is trademark of Valve
Software and of Sierra Online.
© 2000 TF2 MODELS - Hosted by Planetfortress
Web designer/Webmaster : IXNAY
