INTRODUCTION
Well, this couldn't be simpler. As you may well be able to guess from the title,
if not experience, the hit boxes are invisible boxes that the game uses to
calculate wether you have been hit or not. In Quake2 there was one simple
bounding box which sat roughly around the outside of the model. In Half-Life
Deathmatch, it's the same, however, in single-player, AI enemies any, or all
bones can have their own hit box, making for more accurate hit locations. So,
NOTE: this tutorial is only worth bothering with if you are generating a single
player enemy.
When you compile a model, if you don't have any hitbox command lines in the QC
file, then studiomdl attempts to generate it's own, and sometimes does a better
job of it. However if you add new bones, it'll often totally ignore them,
meaning that you must create your own. The downside of this is that if
you have just one hitbox command line then Studiomdl won't bother generating
it's own at all. So, basically it's all or nothing.
THE ANATOMY OF A HITBOX COMMAND LINE
Where do you find Hitbox command lines? Well they are in the
Player_Shared.QC file and they look like this :
Scary? No?
Well, actually, No! Just messy. It's actually very simple when it comes down to
it.
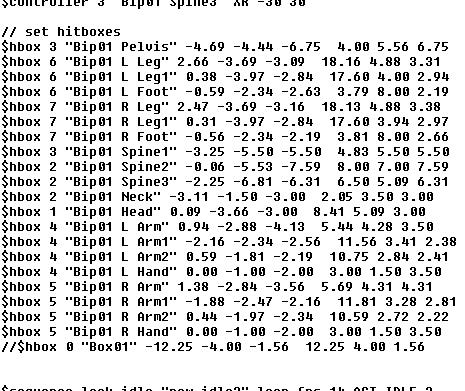
Let's have a look at the layout of the first line:
$hbox 3 "Bip01 Pelvis" -4.69 -4.44
-6.75 4.00 5.56 6.75
We begin with the command:
$hbox 3
This tells Studiomdl to generate a hitbox and the information
directly following is to be used to do so.
The number 3 directly after it, relates to similar body parts. For example,
hitbox 4 relates to all the hitboxes in the Left arm, hitbox 5 is assigned to
all the hitboxes in the Right arm and so on and so on.
This gives Half-Life some idea of where the model has been hit and what death
animation to use should the wound be fatal.
It seems that you MUST include some kind of number or you get a 'line is
incomplete' error when trying to compile. If you add new bones, assign the
hit-box a number that relates to it's group. For example if you were to add an
extra link in the legs to make them dog-legs, then you would need to generate
hitboxes for the new bones. The new leg bone in the left leg would be given the
number $hbox 6 because all the other left leg hitboxes have the number 6 and so
on...
If you have any doubt, make it $hbox 0 and that should work. Do not make any
part group 1 because that is the head number and the head takes more damage than
the other body parts (thanks to Spider for that).
"Bip01 Pelvis"
This names the bone specifically that the Hitbox will apply
to. Simple as that. I have found that with SMDs exported from Milkshape that if
a Bone has no vertexes assigned to it then Studiomdl says that it can't find it.
If this happens, then delete the hitbox line relating to the bone, or assign it
a vertex or two.
-4.69 -4.44 -6.75 4.00 5.56 6.75
Next are the dimensional coordinates of the hitbox. The
numbers that set the size and shape of each box. What we have here are six
decimal numbers, each divided by a space. These numbers relate to the faces of
the box, one for each of the six faces, and simply set each face's distance from
the centre of the bone. The numbers can be anything you want and don't
necessarily need to have a decimal point. For example this line could easily
read like this: -4 -4 -6 4 5 6
In our example line, the first number, '-4.69' moves the right-hand face away
from the centre of the bone. It is a negative number, so the greater the number,
the further from the bone it will be positioned. For example, -10.0 will be
further out from the bone than -4.69
The second number, '-4.44' moves the front face forward.
The third number, -6.75 moves the bottom face downward away from the bone.
The fourth number, 4.00 moves the left face away from the bone. Notice we are
now into positive numbers, but we do not put a + sign before the numbers as we
do a - with the negative numbers.
The fifth number, 5.56 moves the rear face on the box backwards away from the
bone.
The final number, 6.75 moves the top face upwards.
So, in a nut-shell. If you set the number to 0 then each face would be centred
directly on the centre of the bone. negative numbers move the faces right,
forward and down. Positive numbers move the faces left, down and back. and
here's a diagram to show you:
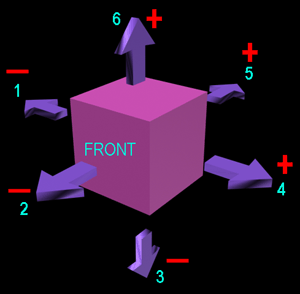
The pale blue numbers assigned to each face tell you which number of the six
affect that face. The red positive and negative symbols tell you wether you
require a positive or negative number to make the face move in the direction of
the arrow.
Just to make it absolutely clear, the face labelled 'FRONT' is where the face
would be if this were a head hit box. Though having written all this, I'd
imagine that 'front' is a term relative to the position of the bone and the
directions are relative locally to the bone. Still, you get the general idea.
Using these six dimensional numbers, it is possible to create a box of any size
and shape. But how do you check wether your hitboxes have been successfully
created?
Well, easily done. Simply compile your model and open it using Chumbalumb's
Model viewer available from Chumbalumb.
Open your shiny new model and under the 'Render' tab, check the Hit Boxes box,
like so:
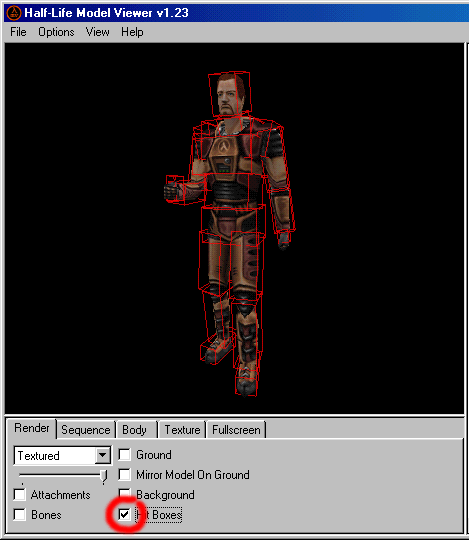
This will show up your newly created hitboxes as shown above. You can now tweak
the numbers in the QC file until the hitboxes are about right.
Of course the one burning question you all want to know is, if you have no
hitboxes assigned, will the model be impossible to hit? And the answer is yes.
However if you don't want someone to use such a model against you, then simply
don't have it on your harddrive and then they will appear as the regular
helmeted HEV suit and will be perfectly hitable.
Tutorial created by Scarecrow,
THANK YOU !!!
©
http://www.Planetfortress.com/TF2Models
TF2 is trademark of Valve
Software and of Sierra Online.
© 2000 TF2 MODELS - Hosted by Planetfortress
Web designer/Webmaster : IXNAY