REFINEMENTS
Okay stage three. We have a fairly humanoid looking model but it's still a
little boxey, so what do we do now? Well. I'm reaching the stage where I'm going
to have to leave you on your own.
You'll need to start combining your imagination with your new-found skills and
take it from there. However, before you go, there are a few tips and optional
things that I have for you:
SMOOTHING GROUPS
At the moment your man here still looks very square. There are a couple of
things we can do to relieve that. Firstly you can smooth the whole mesh in the
viewport.
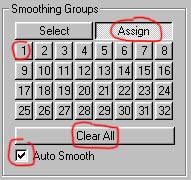
To do this you select the whole model by setting the select option to 'face' and
dragging a selection box around the whole model. Then go to the 'Groups' tab and
make sure that 'Auto Smooth' is checked. Then Click the 'Assign' button and then
click the small square button labelled '1' The whole model has been assigned as
smoothing group '1'. With 'Auto Smooth' checked, the whole group (ie: the whole
model) will be smoothed.
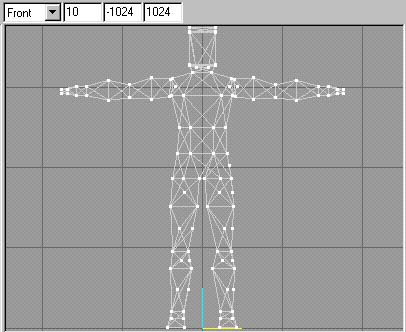
The whole model should look nicely rounded off like so:

This is actually just an illusion, your model isn't really smoother or more
detailed, it's just a lighting trick that blends shadowing across face edges so
that they aren't visible. Edges are still visible on extreme angles and on the
sides of the model. However the effect is used in the game so it's worth doing.
Now it's possible to smooth individual sections of the model creating smoothed
areas and sharp edges in the game. This is particularly useful for creating the
edges of thick garments like flack-jackets etc. I personally can't really notice
the effect in the game, the skin tends to do all the work of creating edges, so
I usually just smooth the whole model. However if you want to smooth sections,
here's how you do it:
Select all of the model and then under the 'Groups' tab, click the 'Clear All'
button. The model, if smoothed will become angular as all the smoothing is
removed.
Now select an area on the model that you want as a smoothed group. Now click the
'Assign' button and then the small square button labelled '1'.
That portion of your model is now smoothing group 1. Now select the next group
and click the button labelled '2', and so on and so on....
What you just did is the same as the first smoothing operation but you assigned
a part of the mesh as group '1' instead of the whole thing.
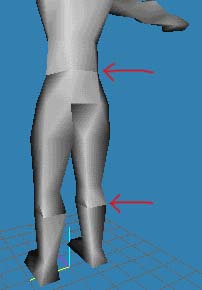
Notice that where smoothing groups meet there is a hard edge like a crease.
VERTEX TWEAKING
Another way of making your model look a little less square is to 'tweak' the
vertexes. That is to simply use the move tool to shift vertexes about to make
the model less angular. There's no right and wrong about this one. You simply
use your own judgement. Here's a before and after shot of our bloke with his
vertexes 'tweaked'.
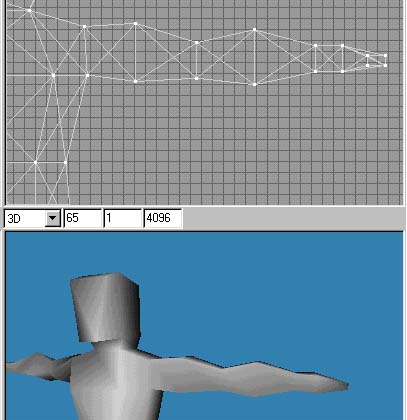
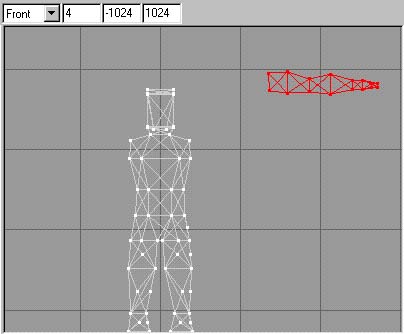
Before: Our bloke is very angular and regular, like a robot.
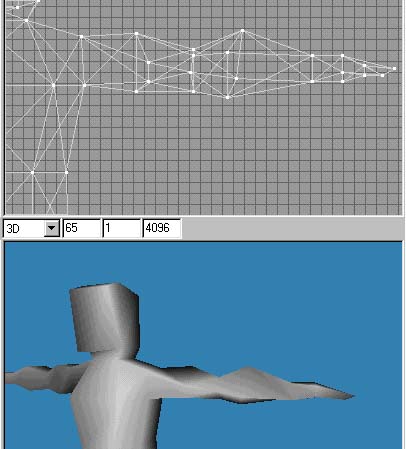
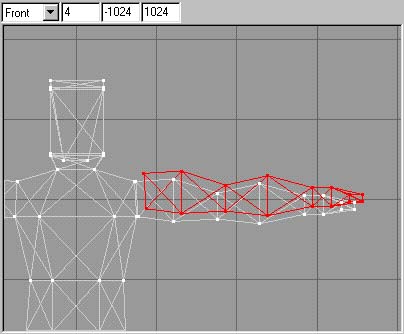
After: Our bloke's arm has been tweaked and it's a little more organic and
chaotic looking. There are less regularities in it. I generally do this with all
my models but whilst you make the layout of the vertexes in the model erratic,
try to keep limbs symmetrical. A good idea might be to tweak one limb and when
you are happy with it, copy and mirror it and replace the existing one with it,
so that both legs are still symmetrical despite having somewhat random vertex
placement. The example above is somewhat exaggerated and a little messy looking
but more complex areas with more vertexes and more subtle vertex 'tweaking' can
look quite effective.
ADDING DETAILS
Okay so You've done all that but he still looks like a B-Movie robot. Well, if
you've followed this tutorial exactly then your model will have 292 faces. Given
that Half-Life running on a good PC system will handle around 700 faces per
model, you have a lot of lee-way to add faces to your model.
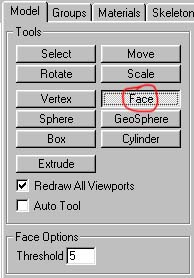
To build whole new faces from scratch, you simply select the 'Face' tool under
the 'Model' tab.
Click on any three vertexes to create a face.
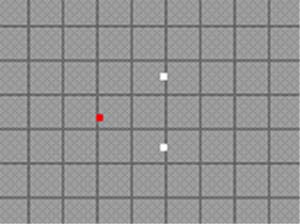
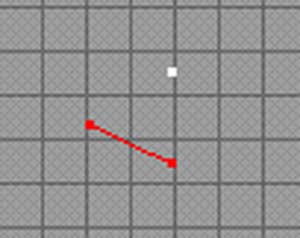
Click on the vertexes in an anti-clockwise manner to create the face towards
you. Click on the first vertex to select it. As you click on the second vertex a
red line will be drawn between the two.
As you click on the third vertex, the face will be drawn.
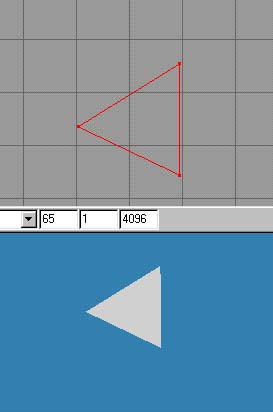
The solid face of a triangle will be light grey. The transparent face of a
triangle will be black (remember, triangles in models are not drawn on both
sides, from one side they are completely invisible).
Okay, but what if you want to build the face out from the model, you might need
one or two new vertexes. For this, select the 'Vertex' tool under the 'Model'
tab:
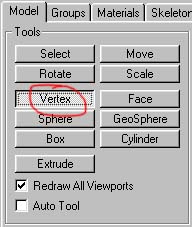
Now if you click on the screen you will create vertexes. They can be created
initially and then moved as usual so that you can put them where you want them.
Then you can build faces onto them. This enables you to delete sections of your
model and re-build them by hand. I built the entire hind quarters of my Quake2
Centaur model in this way.
Another way of creating new faces is to subdivide the mesh. Be careful with this
one though, because it generates a LOT of faces. Basically, if you select a
triangle and this is possible, either by making sure you set to 'Face' select
option and dragging around a triangle and selecting it, or by unchecking the 'By
Vertex' box and simply clicking in the triangle you wish to select. Now go to
'Face' and then select 'Subdivide3'.
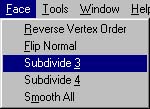
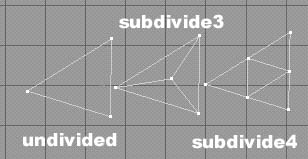
This will divide your current triangle into three. If you were to do this to the
whole mesh, it would triple your face count which is likely to be bad, so be
careful with it. Even more so with Subdivide4.
In cases where you wish to simply divide an edge and place a vertex in it, I
would delete the two existing triangles, create a vertex and build four new
faces into the square rather than subdividing.
SEPERATING ELEMENTS
Animation can wreak havoc with your model especially at the joints, causing
pinching. The shoulders are the worst for it. Quake2 player models have seperate
legs and arms. The Half-Life Gordon model has seperate arms. That is to say that
they are all one model, but within the mesh, the arm isn't attached to the
torso. This means that when they rotate and raise, the vertexes at the shoulder
don't 'pinch'.
'Pinching' is when two vertexes assigned to a bone, orbit the bone as it rotates
and draw together, creating an impossibly thin connection at the joint. With a
bit of work, and careful skeleton placement it is possible to keep your
model-mesh one single piece and minimise the 'pinching'. However, for beginners,
the seperate legs and arms are a good option. I generally find that legs aren't
too bad for pinching, but Half-Life models do tend to suffer from what I call
'Collapsing Arse Syndrome'. Because of the nature of rigid vertex assignment to
the skeleton, when Half-Life models crouch, their backside tends to collapse up
inside the body. It's not terribly noticeable but bad nevertheless.
Okay, this is all well and good, but I've just showed you how to make a humanoid
with the arms and legs attached. D'OH! Well, don't dispair. It is possible to
detach them.
Here we go.
Select the whole of one arm. Go to Edit and 'Duplicate Selection'.
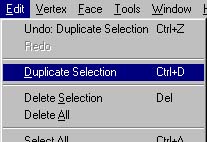
Now move the new arm out of the way. Delete both the original arms.
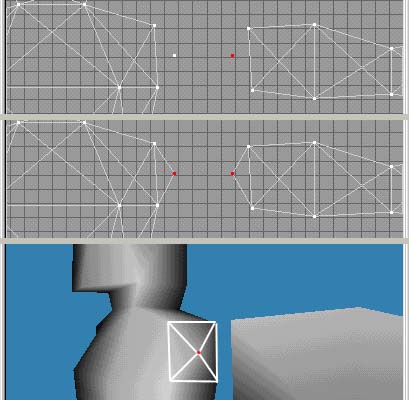
Now in the holes at the shoulder and the end of the arm, create a new vertex and
build faces into the hole so that they stick out slightly at a point:
Once you have done this, Duplicate the arm again and then mirror the new arm.
Now move them into position:
PRACTICING
...or 'Wax on! Wax off!'
I've reached the point where only really your own talent and creativity can take
over. I've shown you how to make a humanoid and all the tips and tricks that I
use when making a model. Okay, so it's a crude shape and it needs serious work
before becoming a halflife model, for example, the head needs much more detail,
but you are on your way. Practice your new-found skills. Experiment and above
all, have fun. A screen full of triangles is like a box of Lego bricks: Given
enough of them, you can make any shape you want and with around 700 triangles to
play with, There is nothing to stop you now but your own imagination ...and the
facecount =)
Tutorial created by Scarecrow,
THANK YOU !!!
©
http://www.Planetfortress.com/TF2Models
TF2 is trademark of Valve
Software and of Sierra Online.
© 2000 TF2 MODELS - Hosted by Planetfortress
Web designer/Webmaster : IXNAY