MILKSHAPE SKINMESHING
Right! Before I begin, I'd like to make it absolutely clear that I have written
this tutorial by the seat of my pants. I am not totally conversant with
Milkshape, I'm not even one of the beta testers. I don't understand fully how it
works, so if you have any problems, it'll probably be pointless e-mailing me.
You'd be better contacting Mete at Chumbalumb or Spider at Wavelength because
they have considerably more experience than me at this program. However, saying
that, I understand enough from playing with it and from reading Mete's brief
tutorial, that I feel I can write my own tutorial that will explain to total
newbies how to get going. Expect these tutorials to be updated and refined on a
regular basis as I learn more and when the full version comes out.
This is a tutorial covering setting up subgroups and skinmesh coordinates in
Milkshape 3D. Milkshape is produced by Chumbalumb soft and is an excellent
alternative to 3DS MAX - as far as making Half Life models goes and at present,
it's free. I'm not sure if it will stay that way, but even if it doesn't, I'm
sure it'll remain a much more affordable alternative to MAX.
SKINMESHING
...a brief explanantion
The objective here, is to take your model mesh and divide it up into small
sub-groups of faces so that they can be conveniently arranged over the skin. The
awkward thing with this, like skinmapping in Studio MAX is that you need the
skin in order to arrange your sub-groups. Unlike Quake2 where the skin came
last, here the skin comes in the middle, which could be difficult for some of
you, we'll see.
SUBGROUPS
...with the assistance of Geoff, the incredible
low poly man
Okay, Let's use the model human I showed you how to make in the modelling
tutorial. Okay, I know I made him in MAX, and the point here is to avoid MAX,
but given that the import options at the moment are somewhat limited, I suggest
you go for MD2.
Possibly the easiest way to do this is make your model in one of the freely
available Quake2 modelling packages and export it as an MD2. Then import it into
Milkshape as an MD2 file.
You do this by simply going to File/Import/Quake2 MD2
You should see your model in front of you.
NOTE: It is possible to skin your model in a Quake2 modeller and skip straight
to the 'assigning materials' section of this tutorial. MD2s retain their mapping
coordinates when imported. I have tagged a brief explanation of using
pre-skinmapped Quake2 models to the bottom of this tutorial.
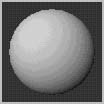
Okay, so I've imported 'Geoff' my low-poly man from the modelling tutorial.
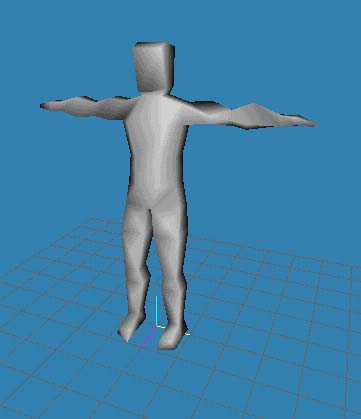
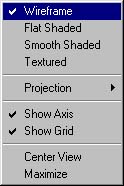
The first thing to do is switch to wireframe mode so that we can see his
triangles or 'faces'. You do this by right-clicking in the viewport and
selecting 'wireframe' from the following drop-down menu.
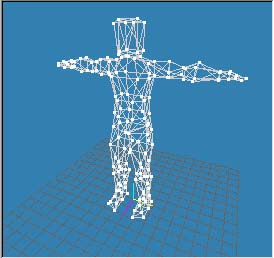
And Geoff should now look like this:
Now we can select individual groups of faces and assign them a group name. For
example, all the triangles that make up the chest might be a group and you can
label them 'chest'. Then all the triangles that make up one side of the left arm
might be a second group and called 'left_arm_outer' and so on and so on.
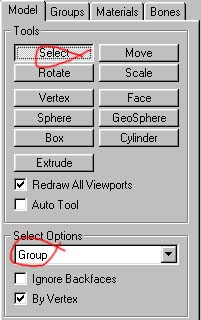
To select faces, first make sure you have the 'Select' button pressed under the
'Model' tab on the right hand side, and 'Face' selected in the Select Options.
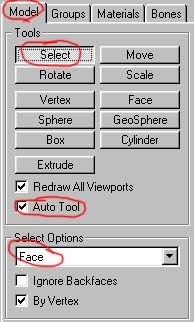
TIP: If you have 'Auto Tool' checked at the bottom then the selection will
automatically revert back to 'select' each time you use one of the other
commands.
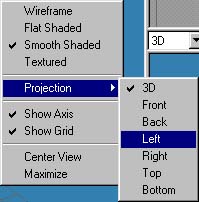
Let's start with the chest. Drag a selection box around the triangles that make
up the chest. It might be easier to view the model from the side to do this. If
you need to switch to the side view, right-click in the viewport and under 'Projection',
select 'Left' or 'Right'.
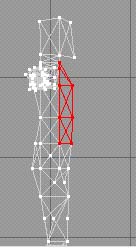
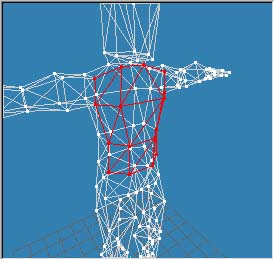
Now hold down the left mouse button and drag a selection square around the
desired faces. They will light up red.
You might select too many faces. If you do, you can deselect the unwanted ones
by holding down the shift key and the right mouse button and dragging across
them.
You might not get all the faces you want. If not then hold down the shift key
and the left mouse button and drag across the faces you want. Your original
selection will not be lost.
Play with this until you have only the chest faces selected:
Now you need to permanently record those faces as a group.
Click the 'Groups' tab on the top right and you will be presented with this
rollout:
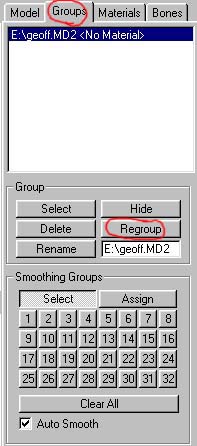
The large white square area is a list of all the skinning subgroups in your
model. Notice that your model is currently listed as one single group and that,
by default is the name of the model you imported including it's path. In my
example that is 'E:/Geoff.MD2 (No Material)'
Now with your 'chest' faces selected, click the 'Regroup' button. You will see
that a new group has been created in the list:
Regroup01 (No Material)
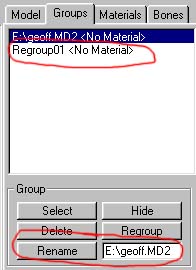
To make things less complicated we will rename it as 'Chest'. First click on the
'Regroup01 (no texture)' in the list to highlight it so that it is selected.
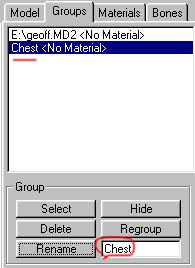
Now, find the 'Rename' button at the bottom of the screen and delete the
contents of the field next to it. Now type 'chest' into the field and click 'Rename'.
Regroup 01 will be renamed as 'Chest' so you can remember which group it is.
Now click the 'Hide' button.
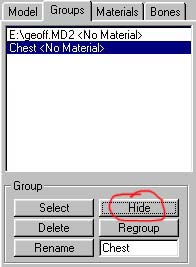
Your chest subgroup will disappear. It isn't deleted, merely hidden so that it
doesn't get in the way while you work on the other faces. Once you have finished
assigning the subgroups, you can unhide all the faces by going to: Edit/Unhide
All.
Now repeat this process with the model's back. And we shall call this group
'back' (imaginative, no?)
Go back to the 'Model' tab, select the triangles making up the model's back, in
the same way as you did, the chest. When you are satisfied that you have the
triangles you want, go to the 'Groups' tab and click 'Regroup' and then rename
the new regroup as 'Back' this will have permanently recorded those faces as the
'Back' regroup. Now hide them aswell.
Repeat this until all faces on the model are assigned as groups, with relevant
titles. As examples, I generally divide my humanoid meshes up like this:
Chest, Back, Arms outer, Arms inner, legs outer, legs inner, foot top, foot
sides, foot bottom, face, Head, neck front, neck back, hands top, hands bottom.
Of course you can set up any groups you want and name them what you want, this
is just an example.
MAKING THE SKIN
I won't go into too much detail here (because a skinmaking tutorial will follow
soon, hopefully), except to say that basically, you'll need to take your list of
sub-groups and roughly draw out the layout on a piece of paper, trying to fill
as much space as possible and ticking off each subgroup as you go, then make the
skin in a paint package. Try to get your head around the idea that you are
making the skin first and fitting the mesh to it, rather than like in Quake2
where you made the skinmesh and coloured in to the lines. Try to keep the skin
exactly square and also an exact size (64x64 128x128 255x255) try not to go
larger than these sizes either.
For a player model skin, a single 255x255 skin .bmp in 255 colours (8 bit) is
perfect.
SETTING UP MATERIALS
Okay, the Gordon skin is made up of two pieces. The main body piece which is a
256x256 skin and the face detail which is a 128x128 skin:


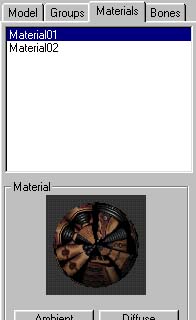
Go to the 'Materials' tab, and you will see this rollout:
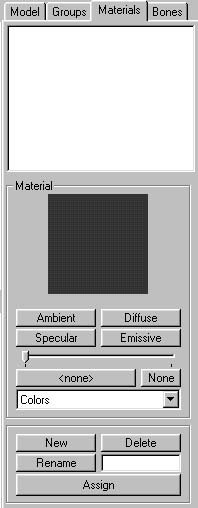
We need to create two materials because we have two skin pieces.
Firstly click the 'New' button near the bottom and a sphere will appear in the
previously black square.
This is a blank material and we need to assign a skin texture material to it.
Click the 'None' button just below the sphere. The 'none' basically means that
there are no textures assigned to the sphere at present.
You will now be presented with a file opening window. Find your desired skin and
open it. It will be wrapped around the sphere. I am using the Gordon Base skin:
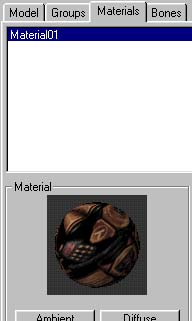
Also notice that it has been listed as 'Material 01' in the box at the top. You
can change it's name as with the subgroups by changing the field next to the 'Rename'
button and clicking the 'Rename' button.
Now for the other skin, Gordon's face. Click new again and then click the 'none'
button. This time open the face skin. There will now be two skin textures listed
in the box at the top. You keep repeating this until all your skins for the
model are listed. I only have two so I am done.
ASSIGNING MATERIALS
Now it's time to start assigning them to their relevant sections
We'll start by skinning the chest as an example. You need to select the 'chest'
group from your subgroups.
First make sure that no faces are selected, by clicking in the viewport away
from the mesh. Now under the 'Groups' tab, click the 'Chest (No Material)' group
in the list to highlight it. Now click the 'Select' button underneath the list
to select the 'chest' subgroup.
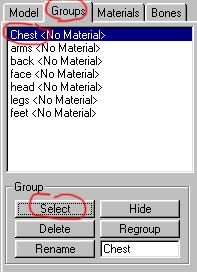
The chest group that you assigned earlier, should light up red. We have now
selected our 'Chest' regrouping ready to apply it's skin texture material.
Go back to the 'Materials' rollout. Select the relevant material for the
sub-group that you have selected, by clicking on it to highlight it. In this
case, we have selected the 'Chest' subgroup, so I need the material with the
chest skin on it. This, in my example is the Gordon Base skin. So I select the
material with the DM_Base.bmp assigned to it.
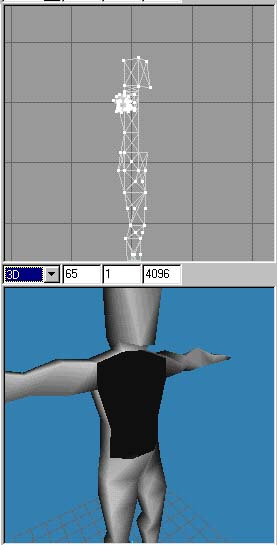
Now make sure that at least one of your viewports is in 3D view by
right-clicking in the viewport and selecting 'Projection/3D' Then drop the same
menu and select 'Textured' if it is not allready checked. Now click the Assign
button at the bottom.
The area changes colour. No texture. This is because we still need to lay out
the mesh over the skin.
Before we do, however, assign materials to the whole model, repeat the process
above by selecting your subgroups and assigning the relevant materials to them.
In my example I have two skins, one of Gordon's head and one of the rest of his
body. I would apply the head skin material to my model's head groups (ie: the
face and back of the head) and I would apply the other skin to the rest of the
body. NOTE: This still has to be done one group at a time, not all together.
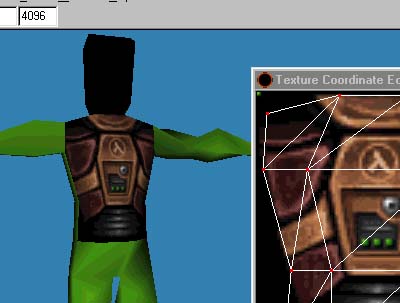
Once they are all assigned, we can now go to the Texture co-ordinate editor and
arrange our mesh over the skin.
We do that like this:
Go to the 'Window' menu and select 'Texture Co-ordinate Editor' like so:

and you will be presented with a new editing window:
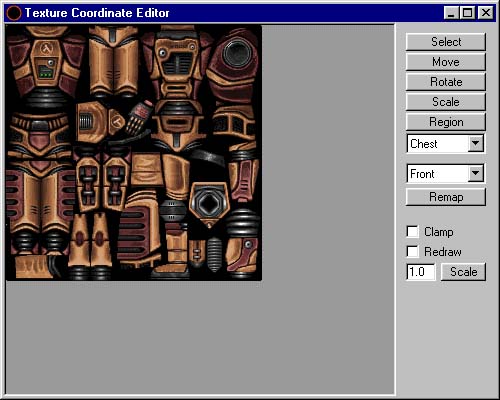
This window will allow you to select your mesh sub-group, present you with the
relevant skin material that you assigned to that group and allow you to arrange
your sub-group faces over the skin so that it is displayed properly on your mesh
subgroup.
NOTE:A skin texture will only appear in this window if a material is assigned to
the group. The relevant texture to the sub-group will be displayed.
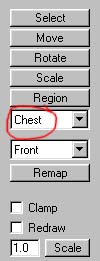
Make sure that 'Chest' is selected in the group selection box (or whichever
group you are working on).
You should see the relevant skinmap texture in the screen to the left. Now I
need to get my 'Chest' subgroup triangles and lay them out over the skin in the
relevant area.
You need to select the sub-group on the model. this can be done two ways. Either
under the Model tab, make sure the 'select' button is active and that 'Group' is
selected in the 'select' options:
Then simply drag a selection box onto just one of the faces that belongs to the
desired group and the whole group will be selected.
There is an easier way of doing this.
Go to the 'Groups' tab and select your group from the list and click the select
button. The relevant group will be selected.
NOTE: Any faces allready selected will not be deselected, so deselect them first
by clicking in the viewport away from the model.
Now with your desired group selected and lit up red on the model, go back to the
Texture Co-Ordinate Editor.
Now we place the sub-group faces on to the skin, by selecting an area of the
skin and mapping the faces in. Then we'll need to tidy them up.
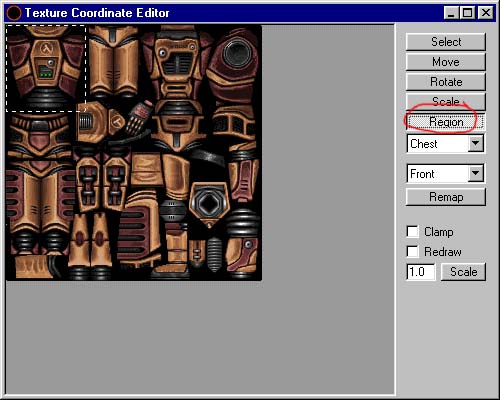
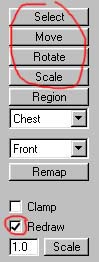
So, first click the 'Region' button and draw a box around the relevant area of
skin. On mine I will draw the box around Gordon's chest, because I am working on
the chest sub-group.
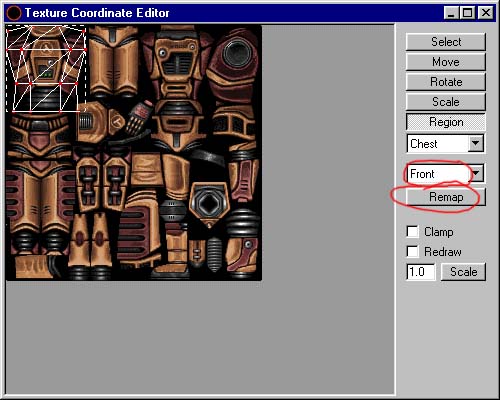
Now we need to grab the faces of our subgroup and place them inside the region
box we just drew. Milkshape will draw them on to the skin from several views.
This enables you to select the best viewpoint to make sure the faces are layed
out pretty much flat-on and not tangled up. Naturally, the best way to view the
chest sub-group would be from the front, so I select 'Front'.
Then click 'Remap'. The faces of the subgroup will be blocked in to the region
box we just drew.
Okay, now we need to adjust the mesh so that it fits the skin piece properly.
It's a little difficult to see at the moment, so we can enlarge it by altering
the value of the scale field.
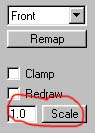
At the moment the value is 1.0 If you change it to 2.0 and click the 'Scale'
button then it'll be twice the size and if you change it to 3.0 and click 'Scale'
it'll be three times the size. You get the idea. To scale it back to it's
original size, set the scale to 1.0 again.
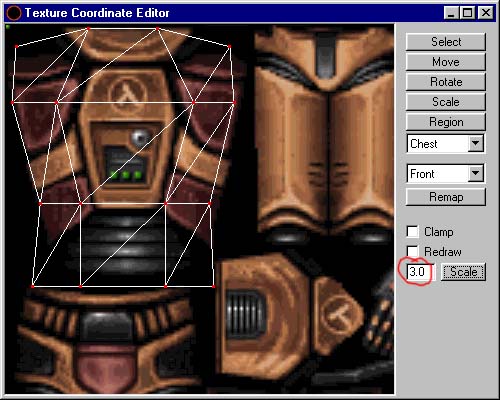
NOTE: Scale automatically zooms into the top left of a skinmap texture, making
it awkward if your vertexes are anywhere else.
Now you need to move, scale and rotate your vertexes to fit the skin neatly
using the tool buttons in the editor.
Fortunately my mesh sub-group fits the Gordon skin fairly neatly so not much
adjusting will be needed. You may not be so lucky.
If you move the Texture Co-Ordinate Editor to one side so that you can see your
model in a textured 3D view, and also check the 'Redraw' box, you will see the
skin being adjusted on the screen so you can fit it exactly.
Once you are happy with the layout, repeat this process, selecting the next
group and laying out it's skin - Until your model is all skinned.
That's your lot! Model skinned. Job done.
ASSIGNING MATERIALS TO A READY MAPPED QUAKE2
MODEL
This is dead easy. As soon as you have imported your MD2, go to the 'Groups' tab.
There should be one single group. Select it and then click the 'Select' button
at the bottom of the list. The whole model should light up red. Now go to the
'Material' tab and make a material as described above, using your Quake2 model's
skin.
NOTE: The skin will need to be converted from 8-bit PCX to 8-bit BMP first.
Then assign the skin. It should automatically position itself on the model,
because the model retains it's texture co-ordinates on import. If you open the
Texture Co-ordinate Editor, you will see the model's faces arranged neatly the
way they are in a Quake2 editor.
Tutorial created by Scarecrow,
THANK YOU !!!
©
http://www.Planetfortress.com/TF2Models
TF2 is trademark of Valve
Software and of Sierra Online.
© 2000 TF2 MODELS - Hosted by Planetfortress
Web designer/Webmaster : IXNAY