HALF-LIFE ANIMATION
...an overview
As you should be fully aware by now, Half-Life uses a 'Skeleton'
to deform the model's mesh, enabling the game to blend between two or more
different animations, thus giving the model a far greater range of expression
than has been seen in FPS games up until now. The game engine is able to blend
the legs from the walk, run or idle animations with the upper torso from any one
of the shoot or aim animations. Furthermore, it then blends between an extreme
'up' aim/fire position and an extreme 'down' aim/fire position, so that the
model aims it's weapon exactly where the player's mouse is pointing, giving more
of a visual cue onscreen to team mates and opponents alike.
To this end, all of these animations must be included; Walk, run, jump, swim,
etc. plus up and down aim and fire animations for all weapons, and then again
for crouching. They total 106 animation files.
Once again, I must give the usual disclaimer: This tutorial will not teach you
how to be a great animator. Indeed it may not even teach you how to animate,
however I hope to at least explain the principles behind Half Life animation, so
that you might figure it out for yourselves. Also note, that 3D Studio MAX is an
incredibly versatile animation package and the various methods, tips and tricks
I am about to show you are not arbitrarily the way to animate, they are
simply the way I animate. I am not an animator, though I am capable of
animating, at least to the level required for FPS games anyway, so this tutorial
might have genuine animators champing at the bit or burying their head in their
hands with despair. If so, please PLEASE, write a better tutorial.
I am not 100% happy with this tutorial as it stands and I will almost certainly
update it as I learn more about animating as well as the things already covered.
This should be enough to get you started though.
IDLE
..or 'Look out, Gordon it's behind
you!
Alright then, let's start with something
simple. A nice idle animation that features the model breathing and looking
around, nothing too taxing so that you can get used to the controls.
First you need to open 3DS MAX and open your base biped.
NOTE: If you have made a custom biped, i.e.: You have changed the Gordon biped
to any significant degree (or added bones to it), then you will need to open
that biped and use it to animate.
NOTE: Your animation files do not need to have the model mesh in it. Only the
Reference SMD needs the mesh. However, it can be handy to have the mesh attached
to the skeleton just so that you can see how it deforms when the animations work.
Now with your Base Biped open, we are going to create an animation loop. A loop
or cycle is an animation that shows the model ending in the same position as it
started, thus an animation can be repeated infinitely and there are no jumps or
twitches.
The first thing we need to do is to set the amount of frames we need for the
animation.
Frames are the segments which an animation is divided into. You will almost
certainly be familiar with conventional cartoon animation, where a series of
images (up to 24 per second) are flashed in front of your eyes giving the
impression of movement. Imagine that each of those still images is a 'Frame'. In
3DS MAX the principle is the same.
The animation we are going to make is an idle animation. It isn't important to
get the amount of frames right for Half-Life as the game will use a cycle no
matter what the size. It is advisable not to go much over 30 frames though. At
the moment we are making an 'idle' animation and so we will use 31 frames
(0-30).
Click the 'Time Configuration' button in the bottom right:

You will be presented with this window:
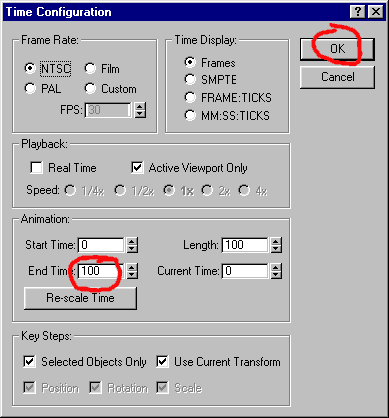
As usual, there are a lot of lovely controls here but we need only concern
ourselves with the 'End Time' field. It will probably be set to 100 as a default.
Clear the 100 and make it 30 instead and click 'OK'.
We now have an animation of 31 frames (0 to 30).
NOTE: the numbers on the slider bar have changed to '0/30'
The next thing we need to do is create a set of starting keys.
KEYS:
Keys or 'KeyFrames' are points in an animation
cycle that tell objects where they should be at what time and what position they
should be in. Not every single frame has a key, though they can if needs be. The
idea is that at three or four main points in an animation, the skeleton needs to
be in a certain position. All you need to do as an animator is set the keys for
those positions at their relevant frames and 3DS MAX will calculate where the
model should be in the frames in between.
What we are about to do is set keys at the start and finish of the animation
cycle so that no matter what you do in between, the model will come to rest at
the same place it started.
Click the 'Animate' button:

Now position your model in the stance you want for it's idle animation. This
will be a weaponless idle animation, so you can do whatever you want with the
hands. Have them by his sides, in his pockets, on his head, whatever. Don't try
to be too adventurous just yet, by his sides will do for now.
NOTE: Make sure you have the animation button activated (red) or any
repositioning of the model you make will not be recorded and the biped will
reset if you move off the frame or close the file.
Now select the whole biped, all of the bones. Do not select the mesh or any
non-bone objects. If you do, they can be deselected by holding down 'ALT' and
clicking on them or dragging round them.
Now right click on the slider bar:

And you will be presented with this little 'Create Key' box:
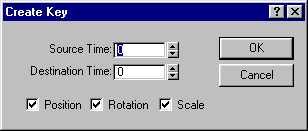
This is a little known and extremely useful little tool in MAX. This box allows
you to copy keys for the selected bones at any frame in the animation (Source
Time), and paste them at another frame in the animation (Destination Time). If
the source and the destination are the same, i.e.: the frame you are currently
on, then it simply creates keys for the selected bones at that frame and they
are fixed there.
At the moment you should be on frame 0 and both fields in the 'Create Key' box
will have 0 in them. This is fine. Click OK and you will create keys for all the
selected bones at frame 0.
Now don't deselect your bones, just move the slider to the far right. It should
now read '30/30' Right-click on the slider again and the fields will now have
the number 30 in each of them. We need to copy the keys from frame 0. So clear
the 'Source Time' field and enter the number 0. Leave the 'Destination Time' as
30 and click 'OK'
Nothing has appeared to happen. This is because without any animation so far,
the model is still in the same position as when it started. Had the model been
animated to a different stance it would have reset itself to the same position
as you put it in at frame 0. This is because you just copied the key (position)
data from frame 0 (Source Time) and put it at frame 30 (Destination Time).
The keys are set. No matter how you animate the skeleton in between now, those
keys will make the skeleton return to it's start position at the end of the
cycle, thus flowing into the next loop.
Now we are going to make the skeleton breathe. You might notice if you observe
Half Life player models closely enough, that when they are idle, they seem to
sway slightly as if they are breathing. We shall do the same.
Make sure that the animation button is activated and move the slider to frame
15, about half way along. It should read '15/30'. Now select all of the chest
segments and using the rotate key, rotate them just a tiny amount. They should
all rotate together if they are all selected.
That's it. Deactivate the animate button, and slide the slider bar all the way
to the left. Now click the 'Play' button in the bottom right:

Notice your model seems to breathe as the chest segments move from their
original position to the newly rotated position at frame 15 and then back the
original position again at frame 30. It's ALIVE! It's ALIVE! =)
Okay, he's breathing but he's not very attentive. Let's make his head turn.
Stop the animation by clicking the stop button which will have replaced the play
button in the bottom right:

Now activate the animate button again and slide the time slider to frame 10 (It
should read '10/30'), and rotate the skeleton's head about 45 degrees to the
right. Now move the slider to frame 20 and rotate the head 45 degrees to the
left.
If you play the animation now, then the head will look left and right as well as
breathing.
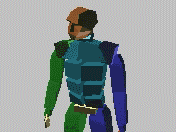
Your end product should look a little like this:
That's it. That's animation in a nutshell. You can build upon this now, have the
shoulders move with the head, maybe the arms and hands can do something
interesting.
To the best of my knowledge, the game positions the skeleton using the Bip01
diamond, so leg animations are restricted by the fact that the model can't
really step around. Don't be too concerned with this anyway, this is just the
first step. Have some fun and practice before we continue, get used to what you
have just learned so that we can build on it in the next stage.
Tutorial created by Scarecrow,
THANK YOU !!!
©
http://www.Planetfortress.com/TF2Models
TF2 is trademark of Valve
Software and of Sierra Online.
© 2000 TF2 MODELS - Hosted by Planetfortress
Web designer/Webmaster : IXNAY