DIGITAL SCULPTING - A TUTORIAL?
As with the Studio MAX modelling tutorial, this has to be one of the most
difficult tutorials to write because of it's primary, fundamental difference to
the others, and that is, with all the other tutorials (except maybe the skinning
one) there are no two ways to go about them, so I can write it, showing you step
by step exactly how to do it. However, with this modelling tutorial, I can no
more teach you how to be a great modeller than I could put a block of stone in
front of you and a chisel and teach you to be a great sculptor. That is, in
effect what you are doing when you model. You are sculpting, digitally. This
means you have to consider the appearance of the subject from all directions.
Proportions have to be exact and symmetrical. It takes a lot of practice and a
lot of self-criticism. It has taken me years to get where I am now (sculpting
aswell as 3D Modelling) and I am still learning all the time. So a large
percentage of your success in following this tutorial also depends on your
natural talent. On the other hand, don't let this discourage you from trying.
Everyone has to begin somewhere and what I am trying to do here is write the
tutorial that I always wanted when I started modelling way back, for Quake1.
So, what this tutorial will be really, is not so much an easy-to-follow
step-by-step guide to making any model that you want but rather a collection of
hints and tips using a basic humanoid as a subject. You will need to be familiar
with the basic Milkshape tools tutorial. This is essential because I am writing
this tutorial from the assumption that you know how to select, zoom, pan, rotate
etc etc...
Also before we start I'd just like to mention that the following modelling
method has been inspired by Andrew Gilmour. It was his tutorial that I initially
read way back when, and while I do things much differently now, it was an
excellent and simple tutorial that you can still read now at the Quake2
Modelling Studio
TO BEGIN AT THE BEGINNING
So we have our Milkshape open and a blank screen in front of us. Where do we
start? Allready there are several options. One is to create a box with 1x3x3
squares dividing the surface up which is the way I used to work. Another is to
create a 'geosphere' and sculpt your model as if it were clay (a method used by
my friend at 'Lionhead'). You can try and make your model all in one go. You
could try and make the head, torso and limbs seperately and attach them later -
This is the way I work. I have created a series of limbs and a basic torso and a
basic head using pretty much the method I'm about to show you, and I keep them
all in seperate files. All my models are simply developments of the same series
of bodyparts. The options are plentyful, we could go on... and on... and on... I
need to choose a method and start somewhere or this could run to page after page
and hundreds of megs of webspace.
So, for the sake of my sanity and brevity, I am going to show you how to make a
basic low-poly humanoid using a box as the base. It will then be down to you to
practice what I am teaching you, experiment and embellish the basic shape
yourself.
THE RAW MATERIALS
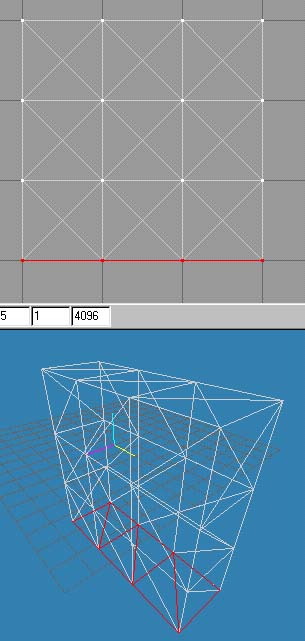
First we need a box, one face deep by three faces wide and three faces high.
Create a box, use the grid as a guide to get it squarish, but don't be too
concerned about getting it perfect.
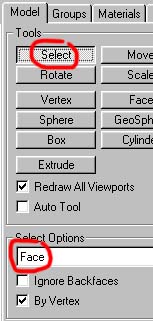
Now we need to extrude the face twice. Pick the 'Select' tool and set the select
options to 'Face'.
Now, in the 'front' view, drag a selection box around the right-hand side of the
box. You will see that the entire box is lit up red. Now deselect all but the
right-hand side by dragging a de-selection box around the left side of the box,
taking care not to include the right-edge. A 'De-Select' box is the same as a
selection box, but you use the right mouse button instead of the left mouse
button and you hold down 'SHIFT'.
NOTE: Selection and de-selection cannot be done in the 3D view.
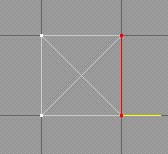
You should now have only the right side face selected and it will be represented
as a red edge on your front view.
Now pick the 'extrude' tool.
we need to be more accurate than simply dragging with the pointer, so we will
use the type-in command fields.
Above the 'X','Y' and 'Z' buttons there are type-in fields. which correspond to
the direction labelled on the button below them.
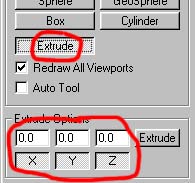
In the field above the 'X' button, type in '20' and then click the 'Extrude'
button to the right of the 'X','Y','Z' buttons (not the 'Extrude' tool button at
the top).
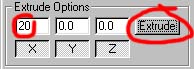
The box should expand to the right (if you are in the front view).
now click again, and it expands again.
Positive values move to the right, and negative values to the left. For example,
if I had typed in -20 then the face would have extruded to the left.
All this applies only to the X direction in the Front viewport. In other
viewports and other planes, the results will be different, however, in all cases,
positive moves one way, negative moves the other.
To help with this one I have included an illustration showing the various planes
and their directional values (positive/negative) in the Milkshape tools tutorial.
So, we now have a box with three segments along it's length. Now select all
three faces along the bottom in the same way as you did the first face, by
selecting and deselecting until you only have the bottom three faces like so:
Now in the 'Front' view again, type in -20 in the 'Y' extrusion box.
NOTE: make sure the 'X' value is set back to '0' or it'll extrude along 'X'
again aswell.
Now click the extrude button alongside three times. This will extrude the
selected faces downwards (negative values in 'Y' are downwards in 'Front' view).
You should now have a box, 1 segment deep, three wide and three tall. Like so:
If you want to extrude manually by dragging with the mouse, simply select the 'Extrude'
tool and click-drag on the screen. Selected faces will be extruded in the
direction you drag the mouse.
It is possible to extrude along one or two directions only by restricting the
movement as you do other tools:
Make sure that the 'Extrude' tool is selected. You will see a series of three 'X','Y'
and 'Z' buttons at the bottom of the extrude tool rollout. Click the 'Y' and 'Z'
buttons to deactivate them. The Extrude option is now set to extrude ONLY in the
'X' direction.
NOTE: restricting to 'X' will only work in this example if you are working in
the 'Front' or 'Back' view. IF you are working in a side view then you will need
to restrict to 'Z'
Now it is possible to drag the pointer in the viewport and extrude in the
direction which you drag the mouse. If you have restricted the movement then the
face will only extrude in the direction(s) you have restricted the movement to,
no matter where you drag the pointer to. This is handy in many circumstances but
not terribly accurate.
THE RETURN OF THE GEOFF. AYE!
...or bio-engineering for beginners
Okay, We need to forge out the basic shape of a bloke to begin with. Let's start
with his head.
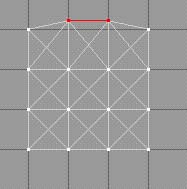
Select the centre square in the top of the block and move it up slightly, thus
creating shoulders:
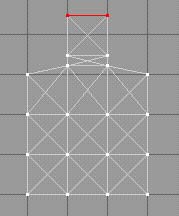
Now extrude the same square up about 5 points and then again about 20 points and
you should end up with something like this:
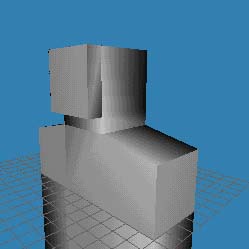
Now Extrude the front face out about 5 points. This will literally be our
model's face.
That's it. Not terribly detailed but it'll do for a start.
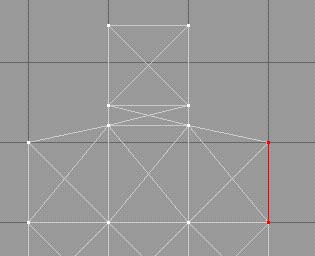
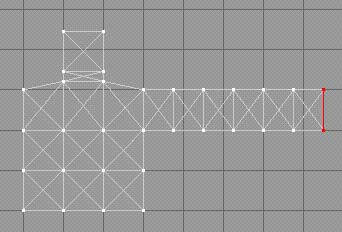
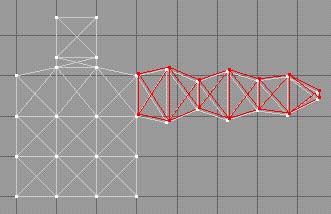
Next are the arms, Select a face on the block side at the top:
Now extrude it six times. This will form the basis of an arm. We have extruded
it enough times to allow us to model muscle bulges and elbow/wrist pinches.
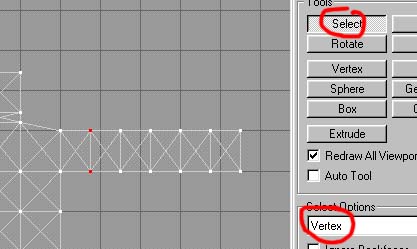
Switch the Selection Options to 'Vertex' and then select all the vertexes in the
first segment:
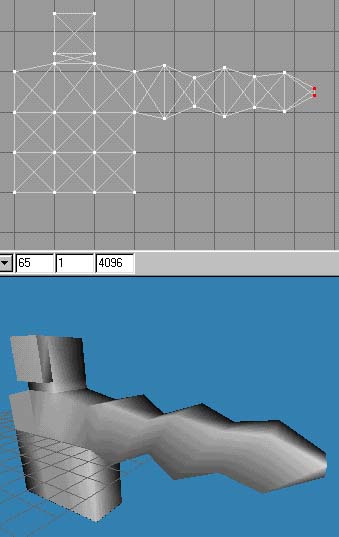
Now scale them up slightly. This will make a handy Bicep. You might want to do
this in the side view because Milkshape only scales in the two directions
relating to the viewport. Now in the next link further along, scale the vertexes
down. This will make a handy elbow. Repeat this to make a forearm, wrist and
knuckles:
Now we need to make the same on the other side. With care and precision it is
possible to repeat this process in reverse and get it spot on. However It's much
easier to simply duplicate the arm, 'mirror' it and weld it on.
Switch the selection options back to 'Face' and select the entire arm.
Now got to 'Edit' in the top menus and select 'Duplicate Selection'
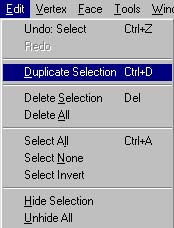
Your arm will be copied. The new one will be highlighted and off-set slightly:
Now select 'Vertex' from the top menu and select 'Mirror left - Right' (provided
you are working in the 'Front' or 'Back' view).
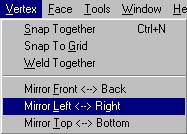
The copied arm will be mirrored to the other side of the model. It will be
slightly offset so you might need to align it in a side view.
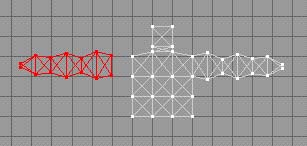
Select the square on the other side of the model that will make the shoulder and
delete it.
Select the entire second arm and move it across to the body so that the vertexes
on it's root meet the vertexes on the other shoulder.
We now need to weld those vertexes together. 'Welding' is the practice of
selecting two vertexes and joining them so that they become one and the faces
that they belong to become permanently attached. Otherwise there will be a gap
in your model, no matter how small.
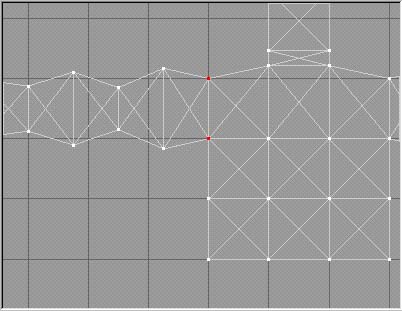
Select a pair of vertexes (remember they will be so close they look like one),
then go to 'Vertex' in the top menus.
Now select 'Snap Together' first and then 'Weld Together'.
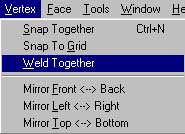
It will seem as if nothing has happened, but they will have welded together.
However, it seems unless they are snapped together first, no matter how close
they are, they will not weld and the arm will still be unattached.
Once all four pairs are welded, we can move on to the Leg.
In the same way as you made the arm, select a square from the bottom to one side
and extrude it five times. This will give you enough segments to make the muscle
bulges, knee and ankle. There is also an extra face at the bottom for the foot.
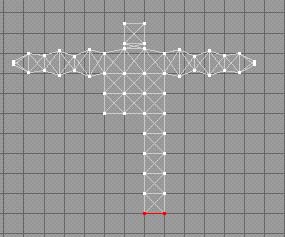
As with the arms, expand the vertexes in the first segment to make an upper leg
muscle bulge and then pinch the ones at the knee. Like so.
Once you reach the bottom, select a face from the front of the leg and extrude
it, this will give you a rough foot shape. Like so.
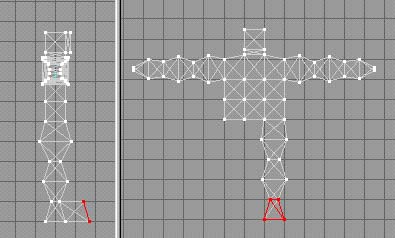
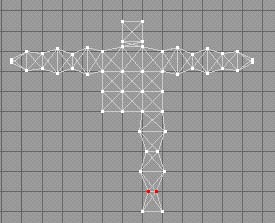
Now mirror and attach the leg as you did the arm.
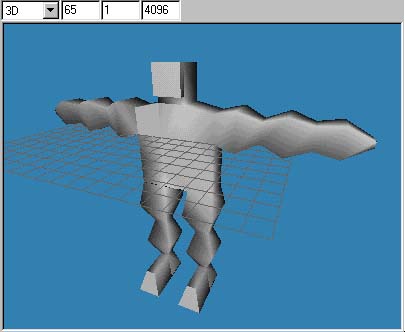
Okay, it's not pretty. In fact it looks like Frankenstien after a car crash, but
it's a start. We now have a basic Humanoid shape to tweak and make more detailed
and more accurate:
Next Page...
Tutorial created by Scarecrow,
THANK YOU !!!
©
http://www.Planetfortress.com/TF2Models
TF2 is trademark of Valve
Software and of Sierra Online.
© 2000 TF2 MODELS - Hosted by Planetfortress
Web designer/Webmaster : IXNAY