Ok, here we go! In this section i will provide you with some information on how to bind your keys, and
stuff around it. I've divided this page into four sections. Choose the one that you think describes your level.
Introduction, Basics, More Basics and Advanced.
Introduction
Binding, what is it exactly? Well, its quite simple and you've done it before.
Yes you did! Binding is connecting certain game commands to buttons. Every used key
ingame is bound to a certain command, sometimes multiple. How we do that and why
we would want that is explained here. Click on 'The basics' to start with the
standard settings in UnF. I'll help you through, and after that, we'll finetune
them in 'more basics'. And if you want to know more, you can find it in 'advanced'.
Here goes!
Basics
In this section I will show you how to set up UnF to play. We no longer need to make our own INI files, there is a special one for UnF now.
Load up UT and go to the UnF menu.
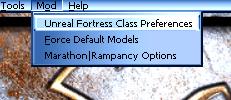
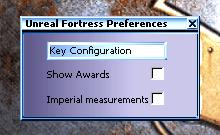
That was easy wasn't it? Well, this small menu is what you see next. A button saying 'Key Configuration' and two checkboxes.
The checkboxes arent important now, so we'll skip to the button.
Well, here we are... The centre of the UnF binds. This is the Common part. Things like shooting and walking
are set here. Let's take a look at the list:
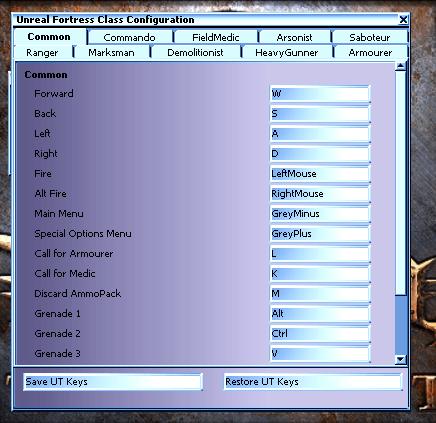
First, you see the movement. You dont really need to set these but its always usefull.
The same with fire and altfire. Not neccesary, but still usefull for the hardcore player.
These are very important. People always ask online 'how they change class' and so on.
Well, most basic functions are in the Special Options menu. Changing class, changing teams and
all those special goodies for all classes.
Next two are very important too. When you use them, for example 'Call for Medic' a red
cross will start floating above your head, and you will hear yourself shouting "Medic!!".
With the next option, you can throw away your unused ammo, so armourers and other classes can re-arm again.
The next three are very important. They are used to throw grenades around. As you can see, mine are
bound very weird, so better not ask.
There is more below, but i think you will get the idea. Be sure to check out all other sections, cuz there
are more classes to bind. Remember one important thing tho: You can double bind keys. For example, you
can bind the E to build a sentry in the Armourer tab, but you can still use the E
key to throw a EMP grenade as Saboteur. Remember that the common tab goes for all classes.
Fill in the other tabs as you like/need the keysettings. It is recommended to fill all keys.
When you have done this, you are ready to play if you want.
More Basics
Let's continue. As you might have noticed, some binds arent really correct.
Some class-only binds are in the common.ini. That results in warnings like 'You are not an armourer!',
and 'Only Demolitionists can handle Claymores!'. This is because binds that are in the common.ini
go for all classes, but the commands don't. We can fix that easily.
Lets open the unf.ini we've made and look at the binds. To be safe, it's best to backup the files we are going to edit first.
I've skipped trough to the part were the letter A starts. There is a lot of more stuff in the beginning of the file, but let's start here.
A=StrafeLeft
B=behindview 1|onrelease behindview 0
D=StrafeRight
E=ImproveSentry
f=Feign
H=speech 3 16 0
i=speech 2 3 -1
j=speech 4 14 0
K=CallMedic
P=speech 2 0 -1
Q=Zoom
R=Reload
U=playersonly
V=primegrenade 3|onrelease throwgren
W=MoveForward
X=
NumPad0=BuildSentry
NumPad1=setdetpack 10
NumPad2=setdetpack 20
NumPad3=setdetpack 60
NumPad4=rotatesentry 90
NumPad5=special
Well, as you can see the Q is set for zoom in. This is a key only the marksman needs.
So why is it in the common.ini? I don't know, but I can fix it.
Open your marksman.ini. It's in your System directory, just like user.ini. Lets see:
[UnrealFortress.Config_ClassMarksman]
bindings[0]=(bindname="Improve Sentry",Command="ImproveSentry",Key="E")
bindings[1]=(bindname="Zoom in",Command="",Key="")
bindings[2]=(bindname="Zoom out",Command="UnZoom",Key="")
bindings[3]=(bindname="",Command="",Key="")
bindings[4]=(bindname="",Command="",Key="")
bindings[5]=(bindname="",Command="",Key="")
Mmmm, that might look complicated, but it isnt! Lets explain it all the way:
bindings[0]=(
This is to indicate the number of the bind, used by UnF to seperate different binds
bindname=" "
Between the quote, you fill in a name for the bind. That way, you can use the bind too when you type the name in the console.
Command=""
This is where we fill in the actual command.
Key="")
And this is where we put the key.
As you can see at the first bind. I have set my key to improve Sentries on the E.
Now, lets bind the zoom key. Look at the second line. Dont worry if there is something else, or it is empty. Lets start with filling in
a bindname. Then fill in the command. You can find most commands in the unf.ini, where we are going to delete it soon.
In our case, the command is 'zoom' (without the quotes). Fill it in. Then we need to set a key.
Fill in a key that you think is usefull for this command. I've set it to the Q.
Now that that is fixed, you can remove the command from the unf.ini. We dont need it there anymore.
Next, look up all the commands that you have meant to be for another class. Open the appropriate classname.ini
and add it like i did above. To practice a bit, think by yourself how you would set the Numpad4 key to rotate the sentry in the armourer.ini
(rotatesentry #). Then, start for yourself.
Advanced
There are three tricks i am gonna show you here. The first is how you have to
bind multiple commands to one key, and the second is a small one about
using text files in your binds. The third one is about wildcards.
The first one is quite simple. You will have to use a | to seperate your binds. I don't know its 'official' name, I'll just
call it a vertical slash.
Let me give you an example. You want the marksman to upgrade sentries with the 'E', and at the same time,
shout 'Enjoy your improved accuracy!!'. To do this, open your marksman.ini,
and go to the first empty line.
bindings[3]=(bindname="",Command="",Key="")
Bindname would be 'upgrade' or something. The command will become:
"ImproveSentry | Teamsay Enjoy your improved accuracy!"
Now, fill in a key and you're finished.
You can use external textfiles to create things like small ASCII images, multiple
lines of text etc. I'll explain it now, but remember that ASCII images don't look good ingame.
This trick is the most usefull when you want to bind multiple commands (like 4 or something).
That way your ini's get less messy.
Start with making a text file. We want to make a small adverstisement for PlanetFortress :-).
We will call the file 'pf.txt'. Open it, and add commands like you would normally do. Every command goes
on a new line, unless you seperate them with a |. In this case, i'm gonna add these lines:
Say Planet Fortress
Say Your source for every thing UnF related!
Say www.planetfortress.com
Say Visit today!
Now, we will bind this to the F3. Open your unf.ini, and search for the line with F3. Put this line there:exec pf.txt
And there you go!
You can also use wildcards ingame. They are used to view variables, like your health. For example, if you type '%c' ingame, it will output your class. You can use these to
inform your teammates about your status. This is the list, and what they do:
| Wildcard | What it shows (example) |
| %c | Classname (Saboteur) |
| %h | Health (67) |
| %a | Armour (103) |
| %s | Sentry's health (80%)** |
| %u | Weapon ammo (48)* |
| %m | Metal ammo (55)** |
| %n | Last person aimed at (Liche) |
* Whats in your clip + what you have left.
** Only goes for armourer.
Pretend you have bound this:
F5=Teamsay My class is %c, my health is %h.
It will show this when you press F5 (example):
My class is Armourer, my health is 87.
|